Tag DIY

DIY – „Do It Yourself“ – is mostly about computers here, and mostly about operating services oneself that these days are typically bought from some platform (using some currency not necessarily monetary in the narrower sense). Indeed, I claim that if digital self-determination means anything (ro: can mean anything given the mad complexity of modern computers in both software and hardware), it will be this: can you run the services you want to use yourself? Or can, perhaps, your friends do that, providing truly social media, from human to human, not mediated via markets, but in direct, well, social interaction?

  • Taming a Synaptics Clickpad

    About the lamest component of my current machine, a Lenovo XP 240, is the touchpad. Well, it's actually a clickpad, i.e., a thing without real buttons that you can press to make mouse button clicks.

    Yes, this machine was designed at a time when everyone thought they had to follow Apple's lead in abolishing the mouse buttons. What they had not considered: while OS X is built around the (IMHO somewhat foolish) notion that there's just one mouse button, in conventional X11 (roughly, left: mark, middle: paste, right: context menu), having just one button really is no fun.

    Fortunately, one can define the button areas rather liberally by X11-configurung the synaptics driver (and prototype things using the synclient program, once one gets used to it quirks[1]) Some duct tape one will even give add some tactile feedback to the pad so you can feel the buttons without having to look:

    Photo: a touchpad with separators with duct tape stuck on it.

    This still stinks, because every time one clicks, the mouse pointer moves. Fortunately, thinkpads also have a stick for pointer motions, and so I could switch off pointer motion through the touchpad entirely. I did that by setting AreaTopEdge to 0 (the default) and AreaBottomEdge to 10 (or something similarly small). Hardware clicks and the detection of the finger's location is unaffected by that setting.

    That has worked fine (within reason), for all the, what, eight years that I've used this box. But my stint into the fediverse made me revisit my clickpad hack. This is because the mastodon client Tootle does not have useful key bindings (like: space bar scrolls a page).

    I have considered adding them but lost all motivation when I noticed that the current vala source does not build on Debian stable, and apparently by a large margin (ah, hipsterware!). I then briefly considered writing mastodon reader myself in a bit of Tkinter but got sidetracked when I noticed I'd have to render at least some subset of HTML (which is an interesting problem in itself, and tk_html_widgets looks fairly promising; but I still let it go).

    And so I've finally implanted a scroll wheel into the stupid synaptics clickpad by enabling two-finger scroll. However, one cannot just switch on two-finger scroll without also switching on pointer motion, too (or can one?). After quite a bit of fiddling, I figured having a little patch in the middle of the touchpad sensitive keeps the number of inadvertent pointer movements to a minimum; once you have a finger there, you can use the entire pad for scrolling with the other finger.

    In sum, this gives the following piece of xorg.conf material, to be dumped to /etc/X11/xorg.conf.d/50-synaptics.conf:

    Section "InputClass"
      Identifier "touchpad"
      MatchProduct "SynPS/2 Synaptics TouchPad"
      Driver "synaptics"
      Option "ClickPad" "True"
    
      # Three buttons of equal size, stretching the whole way vertically
      Option "SoftButtonAreas" "67% 100% 0 0 30% 67% 0 0"
      # Turn off motion altogether: AreaBottomEdge 10 AreaTopEdge 0
      # Motion only detected betwee A.T.E. and A.B.E.
      # Here, use an aread in the middle of the pad:
      Option "AreaTopEdge" "2400"
      Option "AreaBottomEdge" "3200"
    
      # Now enable scrolling with one finger on the sensitive area, the
      # other finger moving to scroll.  Raising FingerHigh can help
      # reducing accidental moves.  VertScrollDelta lets you
      Option "VertTwoFingerScroll" "True"
      Option "VertScrollDelta" "60"
      Option "FingerHigh" "60"
    
      # Our Buttons are on the full area anyway, so:
      Option "HasSecondarySoftButtons" "False"
    
      # A bit of config spam that I'm too lazy to regression test out.
      # I'd expect they're rather safe to drop, though.
      Option "VertResolution" "1000"
      Option "HorizResolution" "650"
      Option "MinSpeed" "1"
      Option "MaxSpeed" "1"
      Option "AccelerationProfile" "1"
      Option "AdaptiveDecelration" "16"
      Option "ConstantDecelration" "16"
      Option "VelocityScale" "1"
    EndSection
    

    Have a look at the comments; on another box, I expect you'd need to fiddle with AreaTopEdge and AreaBottomEdge to find values convenient for you and your specific pad (the coordinates of the limits are most easily found in /var/log/Xorg.0.log). You may also want to play with FingerHigh, the pressure above which the device counts a click; on a clickpad, though, even for reasonable values you will click before you touch.

    [1]Synclient's quirks may not be its fault at all, but it is somewhat annoying that it lets you play with settings for circular pads (CircularScrolling, say) on devices that have no idea what these settings are, that you can set pressure sensitivity parameters (PressureMotionMinZ, PressureMotionMaxZ, PressureMotionMinFactor, PressureMotionMaxFactor) on pads that are, as I'm sure mine is after experimenting a lot, not pressure sensitive, or that it lets you set PalmDetect, PalmMinWidth, and PalmMinZ to absolutely no discernable effect. Ok, on the latter setting the synaptics man page does state that that needs firmware support. But really, if that's so, couldn't the non-supporting firmware be smart enough to not offer the setting in the first place if it does nothing?
  • A Feedback Form in Pelican

    I realise that the great days of discussions on blogs are over, as Sam Hartman blogged the other day – at least for now. Still, I'd like to make it somewhat more straightforward to send me feedback on the posts here than having to get the contact address and dropping me a mail. Hence, I've written a little Python script, feedback, that lets people comment from within their web browsers.

    Nachtrag (2022-10-07)

    Don't take it from here; rather, see https://codeberg.org/AnselmF/pelican-ext

    While the script itself is perfectly general and ought to work with any static blog engine, the form template I give in the module docstring is geared towards pelican and jinja, although only in very few places.

    To make it work, this needs to become a CGI (the template assumes it will show up in /bin/feedback according to the server configuration). The notes on deployment from my post on the search engine apply here, too, except that in addition the host has to be able to deliver mail. Most Unix boxes do locally, but whether anyone reads such mail is a different question.

    Is it ethical to check “ok to publish” by default?

    To configure where it sends mail to (by default, that's root, which may make sense if you have your own VM), you can set the CONTACT_ADDRESS environment variable (see the search engine post in case you're unsure how to do that for a web context). If your machine is set up to deliver mail to remote addresses – be it with a full mail server or using a package like nullmailer –, you could use your “normal” mail address here. In that case, you probably should inform people in your privacy policy that their comments will be sent by unencrypted mail, in particular if that “normal“ e-mail is handled by one of the usual rogues (Google still gets about a half of the mail I send – sigh).

    If you look below (or perhaps right if you run your browser full-screen), you will see that there is a checkbox “feel free to publish“ that, right now, I have checked by default. I had some doubts about that in terms of creepy antipatterns. Of course I am as annoyed by most contemporary cookie banners as anyone else, which in violation of the GDPR usually have practical defaults – sure: not what you get when you say “configure” – set at the maximum creep level the operators believe they can get away with. On the other hand, defaults should also be expectable, and I'd guess the expectation when someone fills out a reply form on a blog is that the response will be published with the article. If you disagree: well, the comment form is there for you.

    In terms of spam protection, I do an incredibly dumb textcha. Even if this script got deployed to a few dozen sites (which of course would be charming), I cannot see some spam engine bothering to figure it out; since it just sends a mail to the operator, there is basically nothing to be gained from spamming using the CGI. I fully expect this will be enough to keep out the dumb spambots that blindly send whatever forms they can find – it has worked on many similar services.

    Security Considerations

    The feedback script does at least two things that could be exploited:

    1. It enters remotely controlled values into rendered HTML and
    2. It calls a local binary with content controlled by the remote user.

    In case (1) – that's when I put the URI of the originating article into the reply message to send people back to where they came from –, this can potentially be exploited in cross-site attacks. Suppose you trust my site on only execute benign javascript (I give you that's close to an oxymoron these days), someone could trick you into clicking on a link that goes to my site but executes their, presumably adversarial, javascript.

    Bugs aside, the script is resilient against that, as it properly escapes any user input that gets copied into the output. That is thanks to my “micro templating“ that I keep around to paste into such one-script wonders. Have a look into the code if you're interested in how that works. And totally feel free to paste that into any Python code producing HTML or XML templated in any way – sure, it's not jinja or stan, but it has covered 80% of my templating needs at much less than 20% of the effort (counted in code lines of whatever dependency you'd pull in otherwise), which is a good deal in my book.

    Case (2) is probably a lot more interesting. In the evaluate_form function, I am doing:

    mail_text = MAIL_TEMPLATE.format(**locals())
    

    Code like this usually is reason for alarm, as far too many text formats can be used to execute code or cause other havoc – the cross-site thing I've discussed for HTML above being one example, the totally bizarre Excel CSV import exploit another (where I really cannot see how this doesn't immediately bring every Windows machine on this planet to a grinding halt). In this case, people could for example insert \ncc: victim@address into anything that gets into headers naively and turn the form into a spam engine.

    There are exactly 10000 lines if Python's email module in version 3.9.

    In addition, there is a concrete risk creating some way of locally executing code, as the template being filled out is then used as an input for a local program – in this case, whatever you use as sendmail. In theory, I'm pretty sure this is not a problem here, as no user-controlled input goes into the headers. If you change this, either sanitise the input, probably by clamping everything down to printable ASCII and normalising whitespace, or by parsing them yourself. The message content, on the other hand, gets properly MIME-encapsulated. In practice, I can't say I trust Python's email package too much, as by Python stdlib standards, it feels not terribly mature and is probably less widely used than one may think.

    But that's a risk I'm willing to take; even if someone spots a problem in the email module, shodan or a similar service still has no way to automatically figure out that it is in use in this form, and my page's insignificance makes it extremely unlikely that someone will do a targeted attack on day 0. Or even day 10.

    But then, perhaps this is a good occasion to read through email's source code? Fun fact: in python 3.9, a find . -name "*.py" | xargs wc -l gives exactly 10000 lines. And my instinct that headers are the trickiest part is probably right, too: 3003 of those are in _header_value_parser.py.

  • 'Failed to reset ACL' with elogind: Why?

    As I've blogged the other day, I like having my machine's syslog on the screen background so I notice when the machine is unwell and generally have some idea what it thinks it is doing. That also makes me spot milder distress signals like:

    logind-uaccess-command[30337]: Failed to reset ACL on /dev/bus/usb/002/061: Operation not supported
    

    I've ignored those for a long time since, for all I can see, logind-like software does nothing that on a normal machine sudo and a few judicious udev rules couldn't do just as well – and are doing on my box. The only reason there's elogind (a logind replacement that can live without systemd) on my box is because in Debian, kio – which in bullseye 270 packages depend upon – depends upon something like logind. The complaints in the syslog thus came from software I consider superfluous and I'd rather not have at all, which I felt was justification enough to look the other way.

    But then today curiosity sneaked in: What is going on there? Why would whatever elogind tries break on my box?

    Well, the usual technique of pasting relevant parts of the error message into some search engine leads to elogind PR #47 (caution: github will run analytics on your request). This mentions that the message results from a udev rule that tries to match hotplugged devices with users occupying a “seat”[1]. The rule calls some binary that would make sure that the user on the “seat” has full access to the device without clobbering system defaults (e.g., that members of the audio group can directly access the sound hardware) – and to keep the others out[2]. The Unix user/group system is not quite rich enough for this plan, and hence a thing called POSIX ACLs would be used for it, a much more complicated and fine-grained way of managing file system access rights.

    Well, the udev rules mentioned in the bug indeed live on my box, too, namely in /lib/udev/rules.d/73-seat-late.rules, which has the slightly esoteric:

    TAG=="uaccess", ENV{MAJOR}!="", RUN{program}+="/lib/elogind/elogind-uaccess-command %N $env{ID_SEAT}"
    

    I frankly have not researched what exactly adds the uaccess tag that this rule fires on, and when it does that, but clearly it does happen in Debian bullseye. Hence, this rule fires, and thus the failing elogind-uaccess-command is started.

    But why does it fail? Well, let's see what it is trying to do. The great thing about Debian is that as long as you have a (proper) deb-src line in your /etc/apt/sources.list, you can quickly fetch the source code of anything on your box:

    cd /usr/src  # well, that's really old-school.  These days, you'll
                 # probably have your sources somewhere else
    mkdir elogind # apt-get source produces a few files
    cd elongind   # -- keep them out of /usr/src proper
    apt-get source elogind
    cd <TAB>  # there's just one child directory
    

    To see where the source of the elongind-uaccess-command would be, I could have used a plain find, but in cases like these I'm usually lazy and just recursively grep for sufficiently specific message fragments, as in:

    find . -name "*.c" | xargs grep "reset ACL"
    

    This brings up src/uaccess-command/uaccess-command.c, where you'll find:

    k = devnode_acl(path, true, false, 0, false, 0);
    if (k < 0) {
             log_full_errno(errno == ENOENT ? LOG_DEBUG : LOG_ERR, k, "Failed to reset ACL on %s: %m", path);
             if (r >= 0)
                     r = k;
     }
    

    Diversion: I like the use of the C ternary operator to emit a debug or error message depending on whether or not things failed because the device file that should have its ACL adapted does not exist.

    So, what fails is a function called devnode_acl, which does not have a manpage but can be found in login/logind-acl.c. There, it calls a function acl_get_file, and that has a man page. Quickly skimming it would suggest the prime suspect for failures would be the file system, as that may simply not support POSIX ACLs (which, as I just learned, aren't really properly standardised). Well, does it?

    An apropos acl brings up the chacl command that would let me try acls out from the shell. And indeed:

    $ chacl -l /dev/bus/usb/001/003
    chacl: cannot get access ACL on '/dev/bus/usb/001/003': Operation not supported
    

    Ah. That in fact fails. To remind myself what file system we are talking about, I ran mount | grep "/dev " (the trailing blank on the search pattern is important), which corrected my memory from “it's a tmpfs” to “it's a devtmpfs”; while it turns out that the difference between the two does not matter for the problem at hand, your average search engine will bring up the vintage 2009 patch at https://lwn.net/Articles/345480/ (also from the abysses from which systemd came) when asked for “devtmpfs acl”, and a quick skim of that patch made me notice:

    #ifdef CONFIG_TMPFS_POSIX_ACL
    (something)
    

    This macro comes from the kernel configuration. Now, I'm still building the kernel on my main machine myself, and looking at the .config in my checkout of the kernel sources confirms that I have been too cheap to enable POSIX ACLs on my tmpfses (for a machine with, in effect, just a single user who's only had contact with something like POSIX ACLs ages ago on an AFS, that may be understandable).

    Well, I've enabled it and re-built my kernel, and I'm confident that after the next reboot the elogind messages will be gone. And who knows, perhaps the thing may actually save me a custom udev rule or two in the future because it automagically grants me access to whatever I plug in.

    Then again: Given there's now an API for Javascript from the web to read USB devices (I'm not making this up) and at least so far I'm too lazy to patch that out of my browsers… perhaps giving me (and hence these browsers) that sort of low-level access is not such a good idea after all?

    [1]See Multiseat on Wikipedia if you have no idea what I'm talking about. If you've read that you can probably see why I consider logind silly for “normal” computers with either a single user or lots of users coming in through the network.
    [2]Mind you, that in itself is totally reasonable: it would suck if everyone on a machine could read the USB key you've just plugged into a terminal; except that it's a rare configuration these days to have multiple persons share a machine that anyone but an administrator could plug anything into.
  • Now on the Fediverse

    Mastodon logo

    AGPL (copyright)

    While I believe that RSS (or rather Atom a.k.a. RFC 4287) is a great standard for subscribing to media like blogs[1], I strongly suspect that virtually nobody pulls my RSS feed. I'm almost tempted to log for a while to ascertain that. Then again, just based on how few people still run RSS aggregators (me, I'm using a quick self-written hack based on python3-feedparser) I am already quite confident the RSS mainly sits idly on my server.

    At least outside of my bubble, I guess what RSS was designed for has been superceded by the timelines of Facebook, Twitter, and their less shopworn ilk. As a DIY zealot, of course none of that is an option for me. What is an option in this field (and what certainly can do with a bit more public attention) is what these days is commonly called the Fediverse, that is, various sites, servers and client programs in the rough vicinity of microblogging, held together by W3C's ActivityPub protocol.

    What this technobabble means in practice: If you already are in the Fediverse, you can follow @Anselm@social.dev-wiki.de and get a toot whenever I post something here (note, however, that most posts will be in German).

    If you're not in the Fediverse yet, well, choose a community[2] – if I had to choose again, I'd probably take a larger community, as that increases one's initial audience: other communities will, for all I understand, only carry your public toots (i.e., messages) if someone in them has subscribed someone from your community –, get a client – I'm using tootle as a GUI and toot for the CLI – and add my Fediverse id.

    To accomodate tooting about new posts, I have made two changes to by pelican tooling: For one, post.py3 now writes a skeleton toot for the new post, like this:

    with open("next-toot", "w", encoding="utf-8") as f:
      f.write(f"{headline} – https://blog.tfiu.de/{slug}.html\n#zuengeln\n")
    

    And I have a new Makefile target:

    toot:
      (cat next-toot; echo "Post?"; read x)
      toot post < next-toot
    

    In that way, when I have an idea what the toot for the article should contain while I'm writing the post, I edit next-toot, and after I've run my make install, I'm doing make toot to notify the Fediverse.

    A side benefit: if you'd like to comment publicly and don't want do use the mail contact below: you can now do that through Mastodon and company.

    [1]That it is a great standard is already betrayed by the fact that its machine-readable specification is in Relax NG rather than XML schema.
    [2]This article is tagged DIY although I'm not running a Mastodon (or other AcitivityPub server) instance myself because, well, I could do that. I don't, for now, because Mastodon is not packaged for Debian (and for all I can tell neither are alternative ActivityPub servers). Looking at Mastodon's source I can understand why. Also, I won't rule out that the whole Fediverse thing will be a fad for me (as was identi.ca around 2009), and if I bother to set up unpackaged infrastructure, I need to be dead sure it's worth it.
  • Explaining Tags in Pelican

    Right after I had celebrated the first anniversary of this blog with the post on my Pelican setup, I decided to write another plugin I've been planning to write for a while: taginfo.py.

    Nachtrag (2022-10-07)

    Don't take it from here; rather, see https://codeberg.org/AnselmF/pelican-ext

    This is for:

    Blog screenshot

    that is, including explanations in on pages for tags, telling people what the tag is supposed to mean.

    To use taginfo, put the file into your plugins folder, add taginfo to the PLUGINS list in your pelicanconf.py, and then create a folder taginfo next to your content folder. In there, for each tag you want to comment, create a file <tagname>.rstx (or just rst). Such a file has to contain reStructuredText, where pelican's extensions (e.g., {filename} links) do not work (yet). I suppose it wouldn't be hard to support them; if you're interested in this plugin, feel free to poke me in case you'd like to see the extra pelican markup.

    To make the descriptions visible, you need to change your tag.html template (typically in theme/templates/tag.html) in order to arrange for tag.make_description() to be callsed when rendering the document. Me, I'm doing it like this:

    {% block content_title %}
    <h1>Tag <em>{{ tag }}</em></h1>
    <div id="taginfo">
            {{ tag.make_description() }}
    </div>
    {% endblock %}
    

    (And I still find jinja templates exceptionally ugly).

  • How I'm Using Pelican

    I started this blog on January 14th last year. To celebrate the anniversary, I thought I could show how I'm using pelican (the blog engine I'm using); perhaps it'll help other people using it or some other static blog generator.

    Posting and Writing

    First, I structure my content subdirectory (for now) such that each article has the ISO-formatted date as its name, which makes that source name rather predictable (for linking using pelican's {filename} replacement), short, and gives the natural sort order sensible semantics.

    Also, I want to start each post from a template, and so among the first things I did was write a little script to automate name generation and template instantiation. Over the past year, that script has evolved into post.py3.

    Nachtrag (2022-03-15)

    I've changed a few things in the meantime; in particular, I am now opening a web browser because I got tired of hunting for the URI when it was scrolled off the screen before I first had something to open, and to make that work smoothly, I'm building the new post right after creating its source.

    It sits next to pelican's Makefile and is in the blog's version control. With this, starting this post looked like this:

    $ ./post.py3 "How I'm Using Pelican"
    http://blog/how-i-m-using-pelican.html
    remake.sh output/how-i-m-using-pelican.html
    

    Nachtrag (2022-05-26)

    The output is now a bit different, and now I do open the browser window – see below.

    What the thing printed is the URL the article will be seen under (I've considered using the webbrowser module to automatically open it, but for me just pasting the URL into my “permanent” blog browser window works better). The second line gives a command to build the document for review. This remake.sh script has seen a bit of experimentation while I tried to make the specification of what to remake more flexible. I've stopped that, and now it's just:

    #!/bin/bash
    pelican --write-selected "$1"
    

    When you add:

    CACHE_CONTENT = True
    LOAD_CONTENT_CACHE = True
    CONTENT_CACHING_LAYER = 'generator'
    

    to your pelicanconf.py, rebuilding just the current article should be relatively quick (about 1 s on my box). Since I like to proofread on the formatted document, that's rather important to me.

    Nachtrag (2022-05-26)

    N…no. This part I'm now doing very differently. See Quick RST Previews.

    If you look at post.py3's code, you will see that it also fixes the article's slug, i.e., the path part of the URL. I left this to Pelican for a while, but it annoyed me that even minor changes to a blog title would change the article's URI (and hence also the remake statment). I was frankly tempted to not bother having elements of the title in the slug at all, as I consider this practice SEO, and I am a fanatical enemy of SEO. But then I figured producing shorter URIs isn't worth that much, in particular when I'd like them to be unique and easy to pronounce. In the end I kept the title-based slugs.

    The script also picks the local file name as per the above consideration with some disambiguation if there's multiple posts on one day (which has only happened once in the past year). Finally, the script arranges for adding the new post to the version control system. Frankly, from where I stand now, I'd say I had overestimated the utility of git for blogging. But then, a git init is cheap, and who knows when that history may become useful.

    I'm not using pelican's draft feature. I experimented with it for a while, but I found it's a complication that's not worth anything given I'm always finishing a post before starting the next. That means that what otherwise would be the transition from draft to published for me is the make install. The big advantage of starting with status:published is that under normal circumstances, an article never changes its URI.

    Local Server Config and Media

    Another pelican feature I'm not using is attaching static files. I have experimented with that initially, but when the first larger binary files came in, I realised they really shouldn't be under version control. Also, I never managed to work out a smooth and non-confusing way to have pelican copy these files predictably anyway.

    What I ended up doing is have an unversioned, web-published directory that contains all non-article (“media”) files. On my local box, that's in /var/www/blog-media, and to keep a bit of order in there, the files sit in per-year subdirectories (you'll spot that in the link to the script above). The blog directory with the sources and the built documents, on the other hand, is within my home. To assemble all this, I have an /etc/apache2/sites-enabled/007-blog.conf containing:

    <VirtualHost *:80>
      ServerName blog
      DocumentRoot /home/anselm/blog/output
    
      Alias /media /var/www/blog-media
    
      ProxyPass /bin/ http://localhost:6070/
    
      <Directory "/home/anselm/blog/output">
        AllowOverride None
        Options Indexes FollowSymLinks
        Require all granted
      </Directory>
    
      <Directory ~ "/\.git">
        Require all denied
      </Directory>
    </VirtualHost>
    

    which needs something like:

    127.0.0.1 localhost blog
    

    in your /etc/hosts so the system knows what the ServerName means. The ProxyPass statement in there is for CGIs, which of course apache could do itself; more on this in some future post. And I'm blocking the access to git histories for now (which do exist in my media directory) because I consider them fairly personal data.

    Deployment

    Nachtrag (2022-07-10)

    I'm now doing this quite a bit differently because I have decided the procedure described here is a waste of bandwidth (which matters when all you have is GPRS). See Maintaining Static Blogs Using git push.

    When I'm happy with a post, I remake the whole site and push it to the publishing box (called sosa here). I have added an install target to pelican's Makefile for that:

    install: publish
      rsync --exclude .xapian_db -av output/ sosa:/var/blog/generated/
      rsync -av /var/www/blog-media/ sosa:/var/blog/media/
      ssh sosa "BLOG_DIR=/var/blog/generated/ /var/blog/media/cgi/blogsearch"
    

    As you can see, on the target machine there's a directory /var/blog belonging to me, and I'm putting the text content into the generated and the media files into the media subdirectory. The exclude option to the rsync and the call to blogsearch is related to my local search: I don't want the local index on the published site so I don't have to worry about keeping it current locally, and the call to blogsearch updates the index after the upload.

    The publication site uses nginx rather than apache. Its configuration (/etc/nginx/sites-enabled/blog.conf) looks like this (TLS config removed):

    server {
      include snippets/acme.conf;
      listen 80;
      server_name blog.tfiu.de;
    
      location / {
        root /var/blog/generated/;
      }
    
      location /media/ {
        alias /var/blog/media/;
      }
    
      location /bin/ {
        proxy_pass http://localhost:6070;
        proxy_set_header Host $host;
      }
    
      location ~ \.git/ {
        deny all;
      }
    }
    

    – again, the clause for /bin is related to local search and other scripting.

    Extensions

    Nachtrag (2022-10-07)

    Don't take the code from here; rather, see https://codeberg.org/AnselmF/pelican-ext

    In addition to my local search engine discussed elsewhere, I have also written two pelican plugins. I have not yet tried to get them into pelican's plugin collection because… well, because of the usual mixture of doubts. Words of encouragement will certainly help to overcome them.

    For one, again related to searching, it's articlemtime.py. This is just a few lines making sure the time stamps on the formatted articles match those of their input files. That is very desirable to limit re-indexing to just the changed articles. It might also have advantages for, for instance, external search engines or havesters working with the HTTP if-modified-since header; but then these won't see changes in the non-article material on the respective pages (e.g., the tag cloud). Whether or not that is an advantage I can't tell.

    Links to blog posts

    The citedby plugin in action: These are the articles that cite this post right now.

    The other custom extension I wrote when working on something like the third post in total, planning to revisit it later since it has obvious shortcomings. However, it has been good enough so far, and rather than doing it properly and then writing a post of it own, I'm now mentioning it here. It's citedby.py, and it adds links to later articles citing an article. I think this was known as a pingback in the Great Days of Blogs, though this is just within the site; whatever the name, I consider this kind of thing eminently useful when reading an old post, as figuring out how whatever was discussed unfolded later is half of your average story.

    The way I'm currently doing it is admittedly not ideal. Essentially, I'm keeping a litte sqlite database with the cited-citing pairs. This is populated when writing the articles (and pulls the information from the rendered HTML, which perhaps is a bit insane, too). This means, however, that a newly-made link will only …

  • Replacing root-tail when there is a compositor

    Since there hasn't been real snow around here this year until right this morning, I've been running xsnow off and on recently[1]. And that made me feel the lack of a compositor on my everyday desktop. Certainly, drop shadows and fading windows aren't all that necessary, but I've been using a compositor on the big screen at work for about a decade now, and there are times when the extra visual cues are nice. More importantly, the indispensable xcowsay only has peudo-transparency when there's no compositor ever since it moved to gtk-3 (i.e., in Debian bullseye).

    Well: enough is enough. So, I'm now running picom in my normal desktop sessions (which are managed by sawfish).

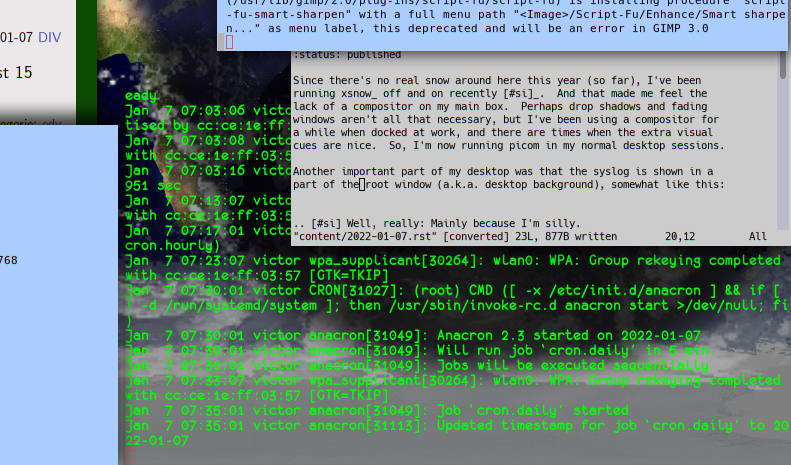
    Another near-indispensable part of my desktop is that the syslog is shown in a part of the root window (a.k.a. desktop background), somewhat like this:

    Windows, and a green syslog in the background

    This was enabled by the nice program root-tail for ages, but alas, it does not play well with compositors. It claims its --windowed flag does provide a workaround, but at least for me that failed in rather crazy ways (e.g., ghosts of windows were left behind). I figured that might be hard to fix and thought about an alternative. Given compositors are great for making things transparent: well, perhaps I can replace root-tail with a heavily customised terminal?

    The answer: essentially, yes.

    My terminal program is unicode-rxvt. In the presence of a compositor, you can configure it for a transparent background by telling it to not use its pseudo-transparency (+tr), telling it to use an X visual with an alpha channel (-depth 32) and then using a background colour with the desired opacity prefixed in square brackets. For a completely transparent terminal, that is:

    urxvt -depth 32 +tr -bg "[0]#000000"
    

    This still has the scrollbar sticking out, which for my tail -f-like application I don't want; a +sb turns it off. Also, I'm having black characters in my terminals by default, which really doesn't work with a transparent background. Making them green looks techy, and it even becomes readable when I'm making the background 33% opaque black:

    urxvt -depth 32 +tr +sb -bg "[33]#000000" -fg green
    

    To replace root-tail, I have to execute my tail -f, put the window into the corner and choose a somewhat funky font. To simply let me reference the whole package from startup files, I'm putting all that into a shell script, and to avoid having the shell linger around, all that this script does is call an exec (yes, for interactive use this probably would be an alias):

    #!/bin/sh
    exec /usr/bin/urxvt -title "syslog-on-root" +sb \
            +tr -depth 32 -bg "[33]#000000" -g 83x25-0-0 \
            -fg green -fn "xft:monofur-11:weight=black" \
            -e tail -f /var/log/syslog
    

    This already looks pretty much as it should, except that it's a normal window with frames and all, and worse, when alt-tabbing through the windows, it will come up, and it will also pollute my window list.

    All that needs to be fixed by the window manager, which is why I gave the window a (hopefully unique) title and then configured sawfish (sawfish-config, “Window Rules”) to make windows with that name depth 16, fixed-position, fixed-size, sticky, never-focus, cycle-skip, window-list-skip, task-list-skip, ignore-stacking-requests. I think one could effect about the same with a judicious use of wmctrl – if you rig that up, be sure to let me know, as I give you it would be nice to make that part a bit more independent of the window manager.

    There's one thing where this falls short of root-tail: Clicks into this are not clicks into the root window. That hurts me because I have root menus, and it might hurt other people because they have desktop icons. On the other hand, I can now mouse-select from the syslog, which is kind of nice, too. Let's see.

    [1]Well, really: Mainly because I'm silly.
  • Zu Fuß im Zug ins Netz

    Screenshot

    Wer hinreichend Geduld und Kompetenz hat, bekommt in den Zügen von Go-Ahead am Ende so eine Seite vom Captive Portal.

    Zu den ärgerlichen Folgen des Irrsinns vom „geistigem Eigentum“ gehören Captive Portals, also Webseiten, auf die mensch in öffentlichen WLANs erstmal umgeleitet wird. Erst, wer Familienpackungen Javascript ausführen lässt und schließlich per Häkchen lügt, er_sie habe die Nutzungsbedingungen gelesen und anerkannt, darf ins Netz. Allein fürs Öffnen dieser Sicherheitslücke („gehen Sie in irgendein unbekanntes Netz und lassen Sie ihren Browser allen Code ausführen, der da rauskommt, und dann ziehen Sie noch megabyteweise Bilder – vielleicht ist ja in einem der Bilder-Decoder auch noch ein Buffer Overflow“) verdient die Geistiges-Eigentum-Mafia Teeren und Federn.

    Na ja, und erstaunlich oft ist der Mist einfach kaputt. Eine besondere Kränkung für die Ingenieursabteilung meines Herzens ist, wenn die ganze aufregende Hi-Tech, mit der mensch in fahrenden Zügen ins Netz kann, prima geht, aber trotzdem kein Bit durch die Leitung zu kriegen ist, weil ein „Web-Programmierer“ im doofen Captive Portal gemurkst hat.

    Kaputt sah das WLAN für mich heute in einem Zug von Go-Ahead aus. Die Geschichte, wie ich mich dennoch ins Netz vorgekämpft habe, finde ich im Hinblick auf manuelles Fummeln an IP-Netzen instruktiv, und so dachte ich mir, ich könnte im nächsten Zug (betrieben von der Bahn und deshalb noch nicht mal mit kaputtem Internet ausgestattet) zusammenschreiben, was ich alles gemacht habe. Das Tooling, das ich dabei verwende, ist etwas, öhm, oldschool. So sollte ich statt ifconfig und route heute wohl lieber ein Programm mit dem schönen Namen ip verwenden. Aber leider finde ich dessen Kommandozeile immer noch ziemlich grässlich, und solange die guten alten Programme aus grauer Vorzeit immer noch auf eigentlich allen Linuxen rumliegen, kann ich mich einfach nicht zur Migration durchringen.

    Am Anfang stand die einfache ifupdown-Konfiguration für das Zug-Netz:

    iface roam inet dhcp
      wireless-essid freeWIFIahead!
    

    in /etc/network/interfaces.d/roam. Damit kann ich sudo ifup wlan0=roam laufen lassen, und der Kram sollte sich verbinden (wenn ihr die Interface-Umbenamsung der systemd-Umgebung nicht wie ich abgeschaltet habt, würde vor dem = einer der kompizierten „vorhersagbaren“ Buchstabensuppen der Art wp4e1 oder so stehen).

    Nur: das Netz kam nicht hoch. Ein Blick nach /var/log/syslog (wie gesagt: etwas altbackenes Tooling; moderner Kram bräuchte hier eine wilde journalctl-Kommandozeile) liefert:

    Jan  2 1████████ victor kernel: wlan0: associate with be:30:7e:07:8e:82 (try 1/3)
    Jan  2 1████████ victor kernel: wlan0: RX AssocResp from be:30:7e:07:8e:82 (capab=0x401 status=0 aid=4)
    Jan  2 1████████ victor kernel: wlan0: associated
    Jan  2 1████████ victor kernel: IPv6: ADDRCONF(NETDEV_CHANGE): wlan0: link becomes ready
    Jan  2 1████████ victor dhclient[18221]: Listening on LPF/wlan0/█████████████████
    Jan  2 1████████ victor dhclient[18221]: Sending on   LPF/wlan0/█████████████████
    Jan  2 1████████ victor dhclient[18221]: Sending on   Socket/fallback
    Jan  2 1████████ victor dhclient[18221]: DHCPDISCOVER on wlan0 to 255.255.255.255 port 67 interval 6
    Jan  2 1████████ victor dhclient[18221]: DHCPDISCOVER on wlan0 to 255.255.255.255 port 67 interval 14
    Jan  2 1████████ victor dhclient[18221]: DHCPDISCOVER on wlan0 to 255.255.255.255 port 67 interval 1
    Jan  2 1████████ victor dhclient[18221]: No DHCPOFFERS received.
    

    Das bedeutet: Das lokale „Router“ (Access Point, AP) hat mich ins Netz gelassen („associated“; das ist quasi das Stecken des Netzkabels), aber dann hat der DHCP-Server, der mir eigentlich eine IP-Adresse hätte zuteilen sollen (mit der ich dann übers lokale Netz hinauskommen könnte), genau das nicht getan: „No DHCPOFFERS received“.

    Wenn das so ist – der Rechner ist Teil von einem Ethernet-Segment, sieht mithin Netzwerkverkehr, bekommt aber keine IP-Adresse und kann also mit niemandem über TCP/IP reden –, lohnt sich ein Blick in die Pakete, die im Netzwerksegment unterwegs sind. Das geht mit fetten Grafikmonstern wie wireshark, aber für einen schnellen Blick tut es tcpdump allemal. Da wir aber noch keine Internet-Verbindung haben, können wir sicher keine IP-Adressen („192.168.1.15“) zu Namen („blog.tfiu.de“) auflösen. Tatsächlich würde der Versuch tcpdump schon zum Stehen bringen. Deshalb habe ich per -n bestellt, Adressen numerisch auszugeben:

    tcpdump -n
    

    Ich sehe dabei einen Haufen ARP-requests, also Versuche, die lokalen Adressen von Ethernet-Karten für IP-Adressen herauszufinden, von denen der Router meint, sie müssten im lokalen Ethernet-Segment sein, etwa:

    12:█████████383626 ARP, Request who-has 10.1.224.139 tell 10.1.0.1, length 28
    

    Aus dieser Zeile allein kann ich schon mal raten, dass das Gateway, also der Router, über den ich ins Internet kommen könnte, wohl die Maschine 10.1.0.1 sein wird. Dabei sind Adressen aus dem 10er-Block leicht magisch, weil sie nicht (öffentlich) geroutet werden und daher (im Gegensatz zu normalen IP-Adressen) im Internet beliebig oft vorkommen können. Sie sind deshalb für relativ abgeschottete Unternetze wie hier im Zug populär (ins richtige Netz gehts dann per Network Address Translation NAT) – und Maschinen mit .1 hinten dran sind konventionell gerne Router.

    Wenn ich mit dem Gateway reden will, brauche ich immer noch selbst eine IP-Adresse. Ohne DHCP-Server bleibt mir wenig übrig als mir selbst eine zu nehmen. Das ist normalerweise ein unfreundlicher Akt, denn wer eine Adresse wiederverwendet, die jemand anders in dem Teilnetz schon hat, macht die Verbindung für den anderen Rechner im Effekt kaputt. Insofern: Wer etwas wie das Folgende tut, sollte erstmal für eine Weile dem tcpdump zusehen und sicherstellen, dass sonst niemand mit der gewählten Adresse unterwegs ist. Wer öfter zu Stunts dieser Art genötigt ist, möge sich arping ansehen – damit kann mensch kontrolliert nachsehen, ob eine Adresse frei ist.

    In meinem Fall war es ruhig im Netz – es hat ja vermutlich auch kaum jemand sonst eine Verbindung bekommen. Ich fühlte mich also hinreichend sicher, irgendwas zu probieren, das der Router wohl als „im eigenen Netz“ akzeptieren würde. Die so geratene Adresse habe ich versuchsweise auf meine Netzwerkschnittstelle geklebt:

    sudo ifconfig wlan0 inet 10.1.0.105 up
    

    Ein guter erster Tipp für diese Zwecke ist eine Adresse, bei der nur das letzte Byte anders ist als in der Router-Adresse (in antikem Jargon: „im selben Klasse C-Netz“). In diesem Fall wäre es denkbar, noch mehr zu ändern, denn im antiken Jargon ist 10.0.0.0 ein A-Netz („die Netzmaske ist 255.0.0.0“), was mit dem Kommando oben (das nicht explizit eine andere Netzmaske gibt) den lokalen Rechner Pakete, die an eine 10.irgendwas-Adresse gehen, an wlan0 schicken lässt. Allerdings macht fast niemand mehr Routen nach diesen Regeln, und so ist es nicht unwahrscheinlich, dass der Router allzu weit entfernte Adressen routen will oder jedenfalls nicht einfach wieder ins lokale Netz-Segment zurückschickt. So in etwa ist die Logik, die mich auf die IP-Adresse oben gebracht hat.

    Wenn meine Vermutungen richtig waren, hätte ich nach dem ifconfig mit dem vermuteten Router bei 10.1.0.1 IP sprechen können. Der Klassiker zur Konnektivitätsprüfung ist ping, und wirklich:

    ping 10.1.0.1
    

    kriegte brav Paket für Paekt zurück. Wow! Immerhin schon IP!

    Ein DHCP-Server konfiguriert als nächstes normalerweise die „Default-Route“, also das, was der Rechner mit Paketen tun soll, für die er nichts anderes weiß. Rechner am Rande des Netzes (und wir ungewaschenen Massen sind eigentlich immer mehr oder weniger am Rande des Netzes) schicken in der Regel alle Pakete, die nicht ins lokale Netz gehen, an einen (und nur einen) Router, nämlich ihr Gateway. Dieses Gateway legt mensch mit meinen alten Werkzeugen so fest:

    sudo route add default gw 10.1.0.1
    

    Damit könnte ich im Netz sein. Ein schnelles ssh auf eine meiner Maschinen im Netz führt aber zu nichts: meine Maschine kann keine Namen auflösen. Ach ja, das ist noch etwas, das normalerweise ein DHCP-Server macht: der lokalen Maschine Adressen geben, an denen sie Namen auflösen kann (die DNS-Server). Über (inzwischen potenziell sehr komplizierte) Umwege enden diese Adressen in gewissem Sinn in der Datei /etc/resolv.conf; dort erwartet sie jedenfalls die C-Bibliothek.

    Nun ist aber der DHCP-Server gerade kaputt. Die Namen von DNS-Servern, die aus einem bestimmten Netz heraus funktionieren, kann mensch jedoch nicht raten. Manchmal – typisch bei privaten Netzen – tut es der Router selbst. Andererseits betreibt Google unter 8.8.8.8 einen DNS-Server, und so ungern ich Google-Dienste empfehle: Die 8.8.8.8 verwende ich in Notsituationen wie dieser. Nur bin ich ja immer noch im Captive Portal, und der Router mag meine Versuche, mit dem Google-DNS zu reden, unterbinden. Viele Captive Portals tun das nicht (aus relativ guten Gründen). Und wirklich:

    ping 8.8.8.8
    

    kommt gut zurück. Andererseits kann mir das Captive Portal natürlich alles vorspielen. Ist da wirklich ein DNS-Server?

    Das Tool der Wahl zum Spielen mit DNS-Servern ist dig [1]. Im einfachsten Fall bekommt dig einen Namen als Parameter, das wird hier zu nichts führen, denn noch hat mein Rechner ja kein DNS. Eine Stufe komplizierter übergibt mensch noch eine Nameserver-Adresse hinter einem @, also:

    dig blog.tfiu.de @8.8.8.8
    

    Und das kommt zurück! Mit der richtigen Information, nicht irgendeinem Mist, den sich das Captive Portal ausdenkt. Damit kann ich für meine temporäre Netzverbindung mein /etc/resolv.conf ändern zu:

    nameserver 8.8.8.8 …
  • El-Cheapo Internationalisation in Pelican and Jinja

    This blog is mainly in German, but in particular computer-related posts I'm writing in (some version of) English, as I expect they might be useful and/or interesting to quite a few people who don't speak German. On the English-language pages, I was always a bit unhappy that the footers (and to a certain degree, menu items) were in German.

    Now, the standard way to “internationalize” programs is gettext, and sure enough, Pelican's template engine Jinja supports i18n with gettext. But my actual use case is mainly to replace large blocks (like the full footer, which has little markup but quite a lot of text), and having gettext-style message catalogues for those seemed unattractive to me.

    Instead, I thought I could somehow work thorugh jinja computed includes, perhaps with something like:

    {% import 'messages-'+article.lang+'.html' as messages %}
    

    For each language I want to support, I'd then have one messages file (messages-en.html, messages-de.html, …), a bit like the message catalogues in gettext, but containing jinja markup.

    The first question to answer was: What jinja markup? After a few experiments, it seems to me that using jinja blocks – which initially had seemed idiomatic to me – to write these messages files is at least tricky. After a while I rather settled for macros, such that the message file could contain something like:

    {% macro basefoot() -%}
     <footer id="main-footer" class="clearfix">
       <ul class="nobull">
       <li><a href="/pages/wer.html">[Wer?/Kontakt]</a>
         | <a href="/archives.html">[Archiv]</a></li>
       ...
    {%- endmacro }
    

    and the application in the template would then be:

    {% block footer %}
      {{ messages.basefoot() }}
    {% endblock footer %}
    

    This works nicely for internationalising large tree fragments and is not a lot worse than gettext for single strings (though I admit message catalogues are a bit nicer to work with when translating).

    The one big problem was how to select the messages. For all the infrastructure pages (archive, tags, categories), I'm happy to use the default language (who looks at them, after all?). Hence,

    {% import 'messages-'+DEFAULT_LANG+'.html' as messages %}
    

    in the base.html template sounded like a good idea and went well enough. Then I thought I could use:

    {% import 'messages-'+article.lang+'.html' as messages %}
    

    in article.html and something similar in page.html. But alas: That won't work, because, as in python, jinja imports only happen once per run and are simply namespace operations when repeated.

    I then tried to put the import statement into a named block, hoping that perhaps block overriding would suppress the default import. I suspect it wouldn't have because block content, I gather, is executed unconditionally, but never mind: it won't work anyway because (at least that's what I gather) blocks have python namespaces of their own, and hence imports in a block are not visible outside of it. Hence, once I put the import statement into a jinja block, my messages object is gone from where I need it.

    So, I ended up with the following hack in base.html:

    {# Yeah, hard-coding the various cases here *is* lame, but
       you can't override an import in a child templates as far
       as I can see, so this seems the least ugly option #}
    {% if article %}
    {% import 'messages-'+article.lang+'.html' as messages %}
    {% elif page %}
    {% import 'messages-'+page.lang+'.html' as messages %}
    {% else %}
    {% import 'messages-'+DEFAULT_LANG+'.html' as messages %}
    {% endif %}
    

    – this is ugly, breaks the encapsulation of the article and page templates, and it generally sucks, but for now it's good enough for me. I suppose the clean way to do this would be through a pelican extension providing a variable main_language (perhaps), computed in much the same way as this.

    Let's see if this hack falls on my feet; for now, I like the way this works out and that most of the stuff on the article pages is now English on English pages and German on German pages.

    Ceterum censeo: the more template languages I use for producing XML (and yes, I'm aware jinja has a much wider scope), the more I'm convinced the low adoption of stan is another instance of IT discarding a clearly superior design. What a pity it is that, for all I can see, all the popular templating engines work against the existing XML markup rather than, as in stan, with it.

  • Fernseh-Livestreams mit Python und mpv

    Nachtrag (2022-10-11)

    Ich habe das Programm jetzt auf codeberg untergebracht

    Die Unsitte, alles in den Browser zu verlegen, ist ja schon aus einer Freiheitsperspektive zu verurteilen – „die Plattform“ gibt die Benutzerschnittstelle vor, kann die Software jederzeit abschalten und sieht (potenziell) noch den kleinsten Klick der NutzerIn (vgl. WWWorst App Store). Bei Mediatheken und Livestreams kommt noch dazu, dass videoabspielende Browser jedenfalls in der Vergangenheit gerne mal einen Faktor zwei oder drei mehr Strom verbraucht haben als ordentliche Videosoftware, von vermeidbaren Hakeleien aufgrund von schlechter Hardwarenutzung und daraus resultierendem Elektroschrott ganz zu schweigen.

    Es gibt also viele Gründe, speziell im Videobereich den Web-Gefängnissen entkommen zu wollen. Für übliche Videoplattformen gibt es dafür Meisterwerke der EntwicklerInnengeduld wie youtube-dl oder streamlink.

    Für die Live-Ströme der öffentlich-rechtlichen Anstalten hingegen habe ich zumindest nichts Paketiertes gefunden. Vor vielen Jahren hatte ich von einem Freund ein paar screenscrapende Zeilen Python erledigt dazu. In diesen Zeiten müssen allerdings Webseiten alle paar Monate komplett umgeschrieben („jquery ist doch total alt, angular.js hat auch schon bessere Tage gesehen“) und regelauncht werden, und das Skript ging mit einem Relaunch ca. 2015 kaputt. Als ich am Freitag die Tagesschau ansehen wollte, ohne DVB-Hardware zu haben, habe ich mich deshalb nach einer Neufassung des Skripts umgesehen.

    Das Ergebnis war eine uralte Seite mit mpv-Kommandozeilen und ein Verweis auf ein von den MediathekView-Leuten gepflegtes Verzeichnis von Live-Strömen. Da stehen zwar oben alt aussehende Timestamps drin, das Log aber zeigt, dass der Kram durchaus gepflegt wird.

    Aus letzterem habe ich livetv.py (ja, das ist ein Download-Link) gestrickt, ein weiteres meiner Ein-Datei-Programme. Installiert mpv (und Python, klar), macht chmod +x livetv.py und sagt dann ./livetv.py ARD Livestream – fertig. Bequemer ist es natürlich, das Skript einfach irgendwo in den Pfad zu legen.

    Das Argument, das das Programm haben will, kann irgendeine Zeichenfolge sein, die eindeutig einen Sender identifiziert, also nur in einem Sendernamen vorkommt. Welche Sender es gibt, gibt das Programm aus, wenn es ohne Argumente aufgerufen wird:

    $ livetv.py
    3Sat Livestream
    ...
    PHOENIX Livestream
    

    Mit der aktuellen Liste könnt ihr z.B. livetv.py Hamburg sagen, weil „Hamburg“ (auch nach Normalisierung auf Kleinbuchstaben) nur in einer Stationsbezeichnung vorkommt, während „SWR“ auf eine Rückfrage führt:

    $ livetv.py SWR
    SWR BW Livestream? SWR RP Livestream?
    

    „SWR BW“ (mit oder ohne Quotes auf der Kommandozeile) ist dann eindeutig, woraufhin livetv an den mpv übergibt.

    Ich gehe davon aus, dass die Anstalten die URLs ihrer Streams auch weiterhin munter verändern werden. Deshalb kann sich das Programm neue URLs von den MediathekView-Leuten holen, und zwar durch den Aufruf:

    $ livety.py update
    

    Das schreibt, wenn alles gut geht, die Programmdatei neu und funktioniert mithin nur, wenn ihr Schreibrechte auf das Verzeichnis habt, in dem livetv.py liegt – was besser nicht der Fall sein sollte, wenn ihr es z.B. nach /usr/local/bin geschoben habt.

    A propos Sicherheitsüberlegungen: Der update-Teil vertraut gegenwärtig ein wenig den MediathekView-Repo – ich entschärfe zwar die offensichtlichsten Probleme, die durch Kopieren heruntergeladenen Materials in ausführbaren Code entstehen, aber ich verspreche nicht, raffinierteren Angriffen zu widerstehen. Abgesehen vom update-Teil halte ich das Programm für sicherheits-unkritisch. Es redet selbst auch nicht mit dem Netz, sondern überlässt das dem mpv.

    Livetv.py sagt per Voreinstellung dem mpv, es solle einen „vernünftigen“ Stream aussuchen, was sich im Augenblick zu „2 Mbit/s oder weniger“ übersetzt. Wer eine andere Auffassung von „vernünftig“ hat, kann die --max-bitrate-Option verwenden, die einfach an mpvs --hls-bitrate weitergereicht wird. Damit könnt ihr

    $ livetv.py --max-bitrate min arte.de
    

    für etwas sagen, das für die Sender, die ich geprüft habe, auch auf sehr alten Geräten noch geht,

    $ livetv.py --max-bitrate max arte.fr
    

    für HD-Wahnsinn oder

    $ livetv.py --max-bitrate 4000000 dw live
    

    für einen Stream, der nicht mehr als 4 MB/s verbraucht.

    Technics

    Die größte Fummelei war, die Kanalliste geparst zu bekommen, denn aus Gründen, für die meine Fantasie nicht ausreicht (MediathekView-Leute: Ich wäre echt neugierig, warum ihr das so gemacht habt), kommen die Sender in einem JSON-Objekt (statt einer Liste), und jeder Sender hat den gleichen Schlüssel:

    "X" : [ "3Sat", "Livestream", ...
    "X" : [ "ARD", "Livestream", ...
    

    – ein einfaches json.loads liefert also ein Dictionary, in dem nur ein Kanal enthalten ist.

    Auch wenn ich sowas noch nie gesehen habe, ist es offenbar nicht ganz unüblich, denn der json-Parser aus der Python-Standardbibliothek ist darauf vorbereitet. Wer ein JSONDecoder-Objekt konstruiert, kann in object_pairs_hook eine Funktion übergeben, die entscheiden kann, was mit solchen mehrfach besetzen Schlüsseln pasieren soll. Sie bekommt vom Parser eine Sequenz von Schlüssel-Wert-Paaren übergeben.

    Für meine spezielle Anwendung will ich lediglich ein Mapping von Stationstiteln (in Element 3 der Kanaldefinition) zu Stream-URLs (in Element 8) rausziehen und den Rest der Information wegwerfen. Deshalb reicht mir Code wie dieser:

    def load_stations():
      channels = {}
      def collect(args):
        for name, val in args:
          if name=="X":
            channels[val[2]] = val[8]
    
      dec = json.JSONDecoder(object_pairs_hook=collect)
      dec.decode(LIST_CACHE)
    
      return channels
    

    – das channels-Dictionary, das collect nach und nach füllt, ist wegen Pythons Scoping-Regeln das, das load_stations definiert. Die collect-Funktion ist also eine Closure, eine Funktion, die Teile ihres Definitionsumfelds einpackt und mitnehmt. So etwas macht das Leben von AutorInnen von Code sehr oft leichter – aber vielleicht nicht das Leben der späteren LeserInnen. Dass die collect-Funktion als ein Seiteneffekt von dec.decode(...) aufgerufen wird und dadurch channels gefüllt wird, braucht jedenfalls erstmal etwas Überlegung.

    Der andere interessante Aspekt am Code ist, dass ich die Liste der Live-Streams nicht separat irgendwo ablegen wollte. Das Ganze soll ja ein Ein-Datei-Programm sein, das einfach und ohne Installation überall läuft, wo es Python und mpv gibt. Ein Blick ins Commit-Log der Kanalliste verrät, dass sich diese allein im letzten Jahr über ein dutzend Mal geändert hat (herzlichen Dank an dieser Stelle an die Maintainer!). Es braucht also eine Möglichkeit, sie aktuell zu halten, wenn ich die Liste nicht bei jedem Aufruf erneut aus dem Netz holen will. Das aber will ich auf keinen Fall, weniger, um github zu schonen, mehr, weil sonst github sehen kann, wer so alles wann livetv.py verwendet.

    Ich könnte die Liste beim ersten Programmstart holen und irgendwo im Home (oder gar unter /var/tmp) speichern. Aber dann setzt zumindest der erste Aufruf einen Datenpunkt bei github, und zwar für neue NutzerInnen eher überraschend. Das kann ich verhindern, wenn ich die Liste einfach im Programm selbst speichere, also selbstverändernden Code schreibe.

    Das ist in interpretierten Sprachen eigentlich nicht schwierig, da bei ihnen Quellcode und ausgeführtes Programm identisch sind. Zu den großartigen Ideen in Unix gehört weiter, dass (das Äquivalent von) sys.argv[0] den Pfad zur gerade ausgeführten Datei enthält. Und so dachte ich mir, ich ziehe mir einfach den eigenen Programmcode und ersetze die Zuweisung des LIST_CACHE (das json-Literal von github) per Holzhammer, also regulärem Ausdruck. In Code:

    self_path = sys.argv[0]
    with open(self_path, "rb") as f:
      src = f.read()
    
    src = re.sub(b'(?s)LIST_CACHE = """.*?"""',
      b'LIST_CACHE = """%s"""'%(in_bytes.replace(b'"', b'\\"')),
      src)
    
    with open(self_path, "wb") as f:
      f.write(src)
    

    Dass das Schreiben ein eigener, fast atomarer Schritt ist, ist Vorsicht: Wenn beim Ersetzen etwas schief geht und das Programm eine Exception wirft, ist das open(... "wb") noch nicht gelaufen. Es leert ja die Programmdatei, und solange es das nicht getan hat, hat mensch eine zweite Chance. Ähnlich übrigens meine Überlegung, das alles in Binärstrings zu bearbeiten: beim Enkodieren kann es immer mal Probleme geben, die am Ende zu teilgeschriebenen Dateien führen können. Vermeide ich Umkodierungen, kann zumindest die Sorte von Fehler nicht auftreten.

    Wie dem auch sei: Dieser Code funktioniert nicht. Und zwar in recht typischer Weise innerhalb der Familie von Quines und anderen Selbstanwendungsproblemen: das re.sub erwischt auch seine beiden ersten Argumente, denn beide passen auf das Muster LIST_CACHE = """.*?""". Deshalb würden von livetv.py update auch diese beiden durch das json-Literal mit den Senderdefinitionen ersetzt. Das so geänderte Programm hat zwei Syntaxfehler, weil das json natürlich nicht in die String-Literale passt, und selbst wenn es das täte, gingen keine weiteren Updates mehr, da die Such- und Ersatzpatterns wegersetzt wären.

    Eine Lösung in diesem Fall ist geradezu billig: in Python kann mensch ein Leerzeichen auch als '\x20' schreiben (das ASCII-Zeichen Nummer 0x20 oder 32), und schon matcht der reguläre Ausdruck nicht mehr sich selbst:

    re.sub(b'(?s)LIST_CACHE\x20= """.*?"""',
      b'LIST_CACHE\x20= """%s"""'...
    

    Sicherheitsfragen

    Ein Programm, das Daten aus dem Netz in sich selbst einbaut, muss eigentlich eine Ecke vorsichtiger vorgehen als dieses hier. Stellt euch vor, irgendwer bekommt etwas wie:

    { "Filmliste": [....,
      "X": ["...
      "Igore": ['"""; os.system("rm -r ~"); """']
    }
    

    in das MediathekView-Repo committet; das würde für die MediathekView immer noch prima funktionieren, das Objekt mit dem Schlüssel Ignore würde fast sicher tatsächlich einfach ignoriert.

    Wer dann allerdings livetv.py update laufen lässt, bekommt den ganzen Kram in Python-Quelltext gepackt, und der Inhalt des Ignore-Schlüssels wird vom Python-Parser gelesen. Der sieht, wie der lange String mit den drei Anführungszeichen geschlossen wird. Danach kommt eine normale Python-Anweisung. Die hier das Home-Verzeichnis der NutzerIn löscht. Python wird die treu ausführen. Bumm.

    So funktioniert das in Wirklichkeit zum Glück nicht, denn ich escape im realen Code Anführungszeichen (das .replace(b'"', b'\\"')). Damit …

  • Stemming for the Search Engine

    First off, here is a quick reference for the search syntax on this site (the search form links here):

    • Phrase searches ("this is a phrase")
    • Exclusions (-dontmatch)
    • Matches only when two words appear within 10 tokens of each other (matches NEAR appear)
    • Trailing wildcard as in file patterns (trail*)
    • Searches don't use stemming by default, but stem for German when introduced with l:de and for English when introduced with l:en
    • See also the Xapian syntax.

    If you only came here for the search syntax, that's it, and you can stop reading here.

    Otherwise, if you have read the previous post on my little search engine, you will remember I was a bit unhappy that I completely ignored the language of the posts and had wanted to support stemming so that you can find, ideally, documents containing any of "search", "searches", "searching", and "searched" when searching for any of these. Being able to do that (without completely ruining precision) is obviously language-dependent, which means the first step to make it happen is to properly declare the languague of your posts.

    As discussed in the previous post, my blogsearch script only looks at elements with the CSS class indexable, and so I decided to have the language declaration there, too. In my templates, I hence now use:

    <div class="indexable" lang="{{ article.lang }}">
    

    or:

    <div class="indexable" lang="{{ page.lang }}">
    

    as appropriate.

    This is interpreted by the indexer rather straightforwardly by pulling the value out of the attribute and asking xapian for a stemmer for the named language. That works for at least most European two-letter country codes, because those happen to coincide with what's legal in HTML's lang universal attribute. It does not work for the more complex BCP 47 language tags like de-AT (where no actually existing stemmer would give results different from plain de anyway) or even sr-Latn-RS (for which, I think, no stemmer exists).

    On searching, I was worried that enabling stemming would blow unstemmed searches, but xapian's indexes are clever enough that that's not a problem. But I still cannot stem queries by default, because it is hard to guess their language from just a word or two. Hence, I have defined a query syntax extension: If you prefix your query with l:whatever, blogsearch will try to construct a xapian stemmer from whatever. If that fails, you'll get an error, if it succeeds, it will stem the query in that language.

    As an aside, I considered for a moment whether it is a terribly good idea to hand through essentially unfiltered user input to a C++ API like xapian's. I eventually settled for just making it a bit harder to craft buffer overflows by saying:

    lang = parts[0][2:30]
    

    – that is, I'm only allowing through up to 28 characters of language code. Not that I expect that anything in between my code and xapian's core has an overflow problem, but this is a cheap defensive measure that would also limit the amount of code someone could smuggle in in case some vulnerability did sneak in. Since it's essentially free, I'd say that's reasonable defensive programming.

    In closing, I do not think stemmed searches will be used a lot, and as usual with these very simple stemmers, they leave a lot to be desired from a linguistic point of view. Compare, for instance, a simple search for going with the result l:en going to see where this is supposed to go (and compare with the result when stemming as German). And then compare with l:en went, which should return the same as l:en going in an ideal world but of course doesn't: Not with the simple snowball stemmer that xapian employs.

    I'm still happy the feature's there, and I'm sure I'll need it one of these days.

    And again, if you need a CGI that can index and query your static HTML collection with low deployment effort: you're welcome.

  • Moving Clipboard Content Between Displays and Machines with Xclip

    Since Corona started, I've had to occasionally run zoom and other questionable telecon software. I don't want that proprietary junk on my main machine, partly because I'm a raving Free software lunatic, partly because binary packages from commercial vendors outside of the Debian main repository have a way of blowing up things years after one has put them on a box. I take some pride in never having re-installed my primary machine since 1996, so there would have been lots of opportunity for binary junk to accumulate.

    Hence I took a spare box I had sitting around idly, quickly put a simple Debian on its disk and then dumped all the questionable proprietary code next to its systemd and pulseaudio, reckoning that shredding that file system once the zoom pandemic is over will give me a lot of satisfaction.

    But now the various links, room ids and whatnot come in on the proper machine. Until a few days ago, I used to move them over to the zoom machine by having a screen open there, ssh-ing in from my main box, running screen -x to attach the screen that is already running in the ssh session, and then pasting the link into that shared screen. It works, but it feels clunky.

    The other day, I finally realised there's a better way using a nifty thing called xclip. I had already used xclip for ages whenever I have two displays running on a single box and I need to copy and paste between the two displaye; that happens when I'm at work. Then, I use the following key bindings (in this case for sawfish) on both ends:

    (bind-keys global-keymap "M-C-v"
            '(system "xclip -in < ~/.current-clipboard"))
    (bind-keys global-keymap "M-C-c"
            '(system "xclip -out > ~/.current-clipboard"))
    

    This lets me hit Alt-Ctrl-C on the first display and Alt-Ctrl-V on the second, and I'll then have what was in the primary selection on the first in the primary selection on the second.

    When later webkit on gtk3 started to copy links into the X11 clipboard rather than the primary selection and I wanted a quick way to get them to where I can middle-mouse them in again, I added another xclip binding to my sawfshrc:

    (bind-keys global-keymap "M-RET"
      '(system "xclip -out -selection clipboard | xclip -in"))
    

    – that's Meta-Return copying the content of the clipoard to the primary selection, and I've come to use that one quite extensively after initially piling quite a bit of abuse on the gtk3 policy of using the clipboard.

    What I noticed the other day was that xclip also lets me conveniently transport the telecon links. I've created an alias for that:

    alias zoomclip='xclip -o | ssh zoom "DISPLAY=:0 xclip -r -l 1 -i"'
    

    (zoom here is the name of the target machine). My new workflow is: select the string to transmit, run zoomclip in a terminal, hit the middle mouse button on the target machine to paste what I selected on the source machine. I'm not sure if it saves a lot of time over the old screen-based method, but it sure feels niftier, and I'd say that's reason enough for that alias.

    Note that the DISPLAY=:0 in the remote command is necessary because xclip of course is a normal X client and needs to know what display to talk to; and you want the local display on the target machine, not the display on the source machine. The -l 1, on the other hand, makes the xclip on the remote machine exit once you have pasted the content. Leave the option out if you expect to need to paste the thing multiple times. But without the -l 1, due to the way the selections are built on X11 (i.e, the system doesn't store selection content, you're always directly sending stuff between clients), xclip runs (and hence the ssh connection is being maintained) until some other client takes over the selection.

  • A Local Search Engine for Pelican-based Blogs

    As the number of posts on this blog approaches 100, I figured some sort of search functionality would be in order. And since I'm wary of “free” commercial services and Free network search does not seem to go anywhere[1], the only way to offer that that is both practical and respectful of the digital rights of my readers is to have a local search engine. True, having a search engine running somewhat defeats the purpose of a static blog, except that there's a lot less code necessary for doing a simple search than for running a CMS, and of course you still get to version-control your posts.

    I have to admit that the “less code” argument is a bit relative given that I'm using xapian as a full-text indexer here. But I've long wanted to play with it, and it seems reasonably well-written and well-maintained. I have hence written a little CGI script enabling search over static collections of HTML files, which means in particular pelican blogs. In this post, I'll tell you first a few things about how this is written and then how you'd run it yourself.

    Using Xapian: Indexing

    At its core, xapian is not much more than an inverted index: Essentially, you feed it words (“tokens”), and it will generate a database pointing from each word to the documents that contain it.

    The first thing to understand when using xapian is that it doesn't really have a model of what exactly a document is; the example indexer code, for instance, indexes a text file such that each paragraph is treated as a separate document. All xapian itself cares about is a string („data“, but usually rather metadata) that you associate with a bunch of tokens. This pair receives a numeric id, and that's it.

    There is a higher-level thing called omega built on top of xapian that does identify files with xapian documents and can crawl and index a whole directory tree. It also knows (to some extent) how to pull tokens from a large variety of file types. I've tried it, and I wasn't happy; since pelican creates all those ancillary HTML files for tags, monthly archives, and whatnot, when indexing with omega, you get lots of really spurious matches as soon as people enter a term that's in an article title, and entering a tag or a category will yield almost all the files.

    So, I decided to write my own indexer, also with a view to later extending it to language detection (this blog has articles in German and English, and they eventually should be treated differently). The core is rather plain in Python:

    for dir, children, names in os.walk(document_dir):
      for name in fnmatch.filter(names, "*.html"):
        path = os.path.join(dir, name)
        doc = index_html(indexer, path, document_dir)
    

    That's enough for iterating over all HTML files in a pelican output directory (which document_dir should point to).

    In the code, there's a bit of additional logic in the do_index function. This code enables incremental indexing, i.e., only re-indexing a file if it has changed since the last indexing run (pelican fortunately manages the file timestamps properly).

    Nachtrag (2021-11-13)

    It didn't, actually; see the search engine update post for how to fix that.

    What I had to learn the hard way is that since xapian has no built-in relationship between what it considers a document and an operating system file, I need to explicitly remove the previous document matching a particular file. The function get_indexed_paths produces a suitable data structure for that from an existing database.

    The indexing also defines my document model; as said above, as far as xapian is concerned, a document is just some (typically metadata) string under user control (plus the id and the tokens, obviously). Since I want structured metadata, I need to structure that string, and these days, json is the least involved thing to have structured data in a flat string. That explains the first half of the function that actually indexes one single document, the path of which comes in in f_name:

    def index_html(indexer, f_name, document_dir):
      with open(f_name, encoding="utf-8") as f:
        soup = bs4.BeautifulSoup(f, "lxml")
      doc = xapian.Document()
      meta = {
        "title": soup_to_text(soup.find("title")),
        "path": remove_prefix(f_name, document_dir),
        "mtime": os.path.getmtime(f_name),}
      doc.set_data(json.dumps(meta))
    
      content = soup.find(class_="indexable")
      if not content:
        # only add terms if this isn't some index file or similar
        return doc
      print(f"Adding/updating {meta['path']}")
    
      indexer.set_document(doc)
      indexer.index_text(soup_to_text(content))
    
      return doc
    

    – my metadata thus consists of a title, a path relative to pelican's output directory, and the last modification time of the file.

    The other tricky part in here is that I only index children of the first element with an indexable class in the document. That's the key to keeping out all the tags, archive, and category files that pelican generates. But it means you will have to touch your templates if you want to adopt this to your pelican installation (see below). All other files are entered into the database, too, in order to avoid needlessly re-scanning them, but no tokens are associated with them, and hence they will never match a useful query.

    Nachtrag (2021-11-13)

    When you add the indexable class to your, also declare the language in order to support stemming; this would look like lang="{{ page.lang }} (substituting article for page as appropriate).

    There is a big lacuna here: the recall, i.e., the ratio between the number of documents actually returned for a query and the number of documents that should (in some sense) match, really suffers in both German and English if you don't do stemming, i.e., fail to strip off grammatical suffixes from words.

    Stemming is of course highly language-dependent. Fortunately, pelican's default metadata includes the language. Less fortunately, my templates don't communicate that metadata yet – but that would be quick to fix. The actual problem is that when I stem my documents, I'll also have to stem the incoming queries. Will I stem them for German or for English?

    I'll think about that problem later and for now don't stem at all; if you remember that I don't stem, you can simply append an asterisk to your search term; that's not exactly the same thing, but ought to be good enough in many cases.

    Using xapian: Searching

    Running searches using xapian is relatively straightforward: You open the database, parse the query, get the set of matches and then format the metadata you put in during indexing into links to the matches. In the code, that's in cgi_main; one could do paging here, but I figure spitting out 100 matches will be plenty, and distributing 100 matches on multiple HTML pages is silly (unless you're trying to optimise your access statistics; since I don't take those, that doesn't apply to me).

    The part with the query parser deserves a second look, because xapian supports a fairly rich query language, where I consider the most useful features:

    • Phrase searches ("this is a phrase")
    • Exclusions (-dontmatch)
    • Matches only when two words appear within 10 tokens of each other (matches NEAR appear)
    • Trailing wildcard as in file patterns (trail*)

    That last feature needs to be explicitly enabled, and since I find it somewhat unexpected that keyword arguments are not supported here, and perhaps even that the flag constant sits on the QueryParser object, here's how enabling wildcards in xapian looks in code:

    qp = xapian.QueryParser()
    parsed = qp.parse_query(query, qp.FLAG_WILDCARD)
    

    Deploying this on your Pelican Installation

    You can re-use my search script on your site relatively easily. It's one file, and if you're running an apache or something else that can run CGIs[2], making it run first is close to trivial: Install your equivalents of the Debian python3-xapian, python3-bs4, and python3-lxml packages. Perhaps you also need to explicitly allow CGI execution on your web server. In Debian's apache, that would be a2enmod cgi, elsewhere, you may need to otherwise arrange for mod_cgi or its equivalent to be loaded.

    Then you need to dump blogsearch somewhere in the file system.

    Nachtrag (2022-10-07)

    Don't take it from here; rather, see https://codeberg.org/AnselmF/pelican-ext

    While Debian has a default CGI directory defined, I'd suggest to put blogsearch somewhere next to your blog; I keep everything together in /var/blog (say), have the generated output in /var/blog/generated and would then keep the script in a directory /var/blog/cgi. Assuming this and apache, You'd then have something like:

    DocumentRoot /var/blog/generated
    ScriptAlias /bin /var/blog/cgi
    

    in your configuration, presumably in a VirtualHost definition. In addition, you will have to tell the script where your pelican directory is. It expects that information in the environment variable BLOG_DIR; so, for apache, add:

    SetEnv BLOG_DIR /var/blog/generated
    

    to the VirtualHost.

    After restarting your web server, the script would be ready (with the configuration above …

  • Math with ReStructuredText and Pelican

    I recently wrote a piece on estimating my power output from CO₂ measurements (in German) and for the first time in this blog needed to write at least some not entirely trivial math. Well: I was seriously unhappy with the way formulae came out.

    Ugly math of course is very common as soon as you leave the lofty realms of LaTeX. This blog is made with ReStructuredText (RST) in pelican. Now, RST at least supports the math interpreted text role (“inline”) and directive (“block“ or in this case rather “displayed“) out of the box. To my great delight, the input syntax is a subset of LaTeX's, which remains the least cumbersome way to input typeset math into a computer.

    But as I said, once I saw how the formulae came out in the browser, my satifsfaction went away: there was really bad spacing, fractions weren't there, and things were really hard to read.

    In consequence, when writing the post I'm citing above, rather than reading the docutils documentation to research whether the ugly rendering was a bug or a non-feature, I wrote a footnote:

    Sorry für die hässlichen Formeln. Vielleicht schreibe ich mal eine Erweiterung für ReStructuredText, die die ordentlich mit TeX formatiert. Oder zumindest mit MathML. Bis dahin: Danke für euer Verständnis.

    (Sorry for the ugly formulae. Perhaps one of these days I'll write an RST extension that properly formats using TeX. Or at least MathML. Until then: thanks for your understanding.)

    This is while the documentation clearly said, just two lines below the example that was all I had initially bothered to look at:

    For HTML, the math_output configuration setting (or the corresponding --math-output command line option) selects between alternative output formats with different subsets of supported elements.

    Following the link at least would have told me that MathML was already there, saving me some public embarrassment.

    Anyway, when yesterday I thought I might as well have a look at whether someone had already written any of the code I was talking about in the footnote, rather than properly reading the documentation I started operating search engines (shame on me).

    Only when those lead me to various sphinx and pelican extensions and I peeked into their source code I finally ended up at the docutils documentation again. And I noticed that the default math rendering was so ugly just because I didn't bother to include the math.css stylesheet. Oh, the miracles of reading documentation!

    With this, the default math rendering suddenly turns from ”ouch” to “might just do”.

    But since I now had seen that docutils supports MathML, and since I have wanted to have a look at it at various times in the past 20 years, I thought I might as well try it, too. It is fairly straightforward to turn it on; just say:

    [html writers]
    math_output: MathML
    

    in your ~/.docutils (or perhaps via a pelican plugin).

    I have to say I am rather underwhelmed by how my webkit renders it. Here's what the plain docutils stylesheet works out to in my current luakit:

    Screenshot with ok formulae.

    And here's how it looks like via MathML:

    Screenshot with less ok formulae.

    For my tastes, the spacing is quite a bit worse in the MathML case; additionally, the Wikipedia article on MathML mentions that the Internet Explorer never supported it (which perhaps wouldn't bother me too much) and that Chromium withdrew support at some point (what?). Anyway: plain docutils with the proper css is the clear winner here in my book.

    I've not evaluated mathjax, which is another option in docutils math_output and is what pelican's render_math plugin uses. Call me a luddite, but I'll file requiring people to let me execute almost arbitrary code on their box just so they see math into the big folder labelled “insanities of the modern Web”.

    So, I can't really tell whether mathjax would approach TeX's quality, but the other two options clearly lose out against real TeX, which using dvipng would render the example to:

    Screenshot with perfect formulae

    – the spacing is perfect, though of course the inline equation has a terrible break (which is not TeX's fault). It hence might still be worth hacking a pelican extension that collects all formulae, returns placeholder image links for them and then finally does a big dvipng run to create these images. But then this will mean dealing with a lot of files, which I'm not wild about.

    What I'd like to ideally use for the small PNGs we are talking about here would be inline images using the data scheme, as in:

    <img src="data:image/png;base64,AAA..."/>
    

    But since I would need to create the data string when docutils calls my extension function, I in that scheme cannot collect all the math rendering for a single run of LaTeX and dvipng. That in turn would mean either creating a new process for TeX and dvipng each for each piece of math, which really sounds bad, or hacking some wild pipeline involving both, which doesn't sound like a terribly viable proposition either.

    While considering this, I remembered that matplotlib renders quite a bit of TeX math strings, too, and it lets me render them without any fiddling with external executables. So, I whipped up this piece of Python:

    import base64
    import io
    import matplotlib
    from matplotlib import mathtext
    
    matplotlib.rcParams["mathtext.fontset"] = "cm"
    
    def render_math(tex_fragment):
        """returns self-contained HTML for a fragment of TeX (inline) math.
        """
        res = io.BytesIO()
        mathtext.math_to_image(f"${tex_fragment}$",
          res, dpi=100, format="png")
        encoded = base64.b64encode(res.getvalue()).decode("ascii")
        return (f'<img src="data:image/png;base64,{encoded}"'
            f' alt="{tex_fragment}" class="math-png"/>')
    
    if __name__=="__main__":
        print(render_math("\int_0^\infty \sin(x)^2\,dx"))
    

    This prints the HTML with the inline formula, which with the example provided looks like this: \int_0^\infty \sin(x)^2\,dx – ok, there's a bit too much cropping, I'd have to trick in transparency, there's no displayed styles as far as I can tell, and clearly one would have to think hard about CSS rules to make plausible choices for scale and baseline – but in case my current half-satisfaction with docutils' text choices wears off: This is what I will try to use in a docutils extension.

  • Foced https Redirects Considered Harmful

    I don't remember where I first saw the admontion that “not everything that does HTTP is a browser“ – but I'd like to underscore this here. One corollary to this is:

    Please do not unconditionally redirect to https!

    People may have good reasons to choose unencrypted http, and sometimes they don't get to choose, in particular in embedded systems (where https may be prohibitively large) or when you cannot upgrade the ssl libraries and sooner or later the server no longer considers any of the ciphers you know safe.

    Case in point: I have a command line program to query bahn.de (python3 version)…

    Nachtrag (2022-09-04)

    after many years of relative stability, the Bahn web page has significantly changed their markup, which broke this script. There is a new bahnconn now.

    …which screen-scrapes the HTML pages that Deutsche Bahn's connection service hands out. I know bahn.de has a proper API, too, and I'm sure it would be a lot faster if I used it, but alas, my experiments with it were unpromising, with what's on the web working much better; perhaps I'll try again next time they change their HTML. But that's beside the point here.

    The point is: In contrast to browsers capable of rendering bahn.de's HTML/javascript combo, this script runs on weak hardware like my Nokia N900. Unfortunately, the N900 is more or less frozen at the state of something like Debian Lenny, because its kernel has proprietary components that (or so I think) deal with actually doing phone calls, and hence I can't upgrade it beyond 2.6.29. And that means more or less (sure, I could start building a lot of that stuff from source, but eventually the libc is too old, and newer libcs require at least kernel 2.6.32) that I'm stuck with Python 2.5 and an OpenSSL of that time. Since about a year ago, these have no ciphers any more that the bahn.de server accepts. But it redirects me to https nevertheless, and hence the whole thing breaks. For no good reason at all.

    You see, encryption buys me nothing when querying train connections. The main privacy breach here is bahn.de storing the request, and there I'm far better off with my script, as that (at least if more people used it) is a lot more anonymous than my browser with all the cookies I let Deutsche Bahn put into it and all the javascript goo they feed it. I furthermore see zero risk in letting random people snoop my train routes individually and now and then. The state can, regrettably, ask Deutsche Bahn directly ever since the Ottokatalog of about 2002. There is less than zero risk of someone manipulating the bahn.de responses to get me on the wrong trains.

    Now, I admit that when lots of people do lots of queries in the presence of adversarial internet service providers and other wire goblins, this whole reasoning will work out differently, and so it's probably a good idea to nudge unsuspecting muggles towards https. Well: That's easy to do without breaking things for wizards wishing to do http.

    Doing it right

    The mechanism for that is the upgrade-insecure-requests header that essentially all muggle browsers now send (don't confuse it with the upgrade-insecure-requests CSP). This does not lock out old clients while still giving muggles some basic semblance of crypto.

    And it's not hard to do, either. In Apache, you add:

    <If "%{req:Upgrade-Insecure-Requests} == '1'">
      Header always set Vary Upgrade-Insecure-Requests
      Redirect 307 "/" "https://<your domain>/"
    </If>
    

    rather than the unconditional redirect you'd otherwise have; I suppose you can parameterise this rule so you don't even have to edit in your domain, but since I'm migrating towards nginx on my servers, I'm too lazy to figure out how. Oh, and you may need to enable mod_headers; on Debian, that would be a2enmod headers.

    In nginx, you can have something like:

    set $do_http_upgrade "$https$http_upgrade_insecure_requests";
    location / {
    
      (whatever you otherwise configure)
    
      if ($do_http_upgrade = "1") {
         add_header Vary Upgrade-Insecure-Requests;
         return 307 https://$host$request_uri;
      }
    }
    

    in your server block. The trick with the intermediate do_http_upgrade variable makes sure we don't redirect if we already are on https; browsers shouldn't send the header on https connections, but I've seen redirect loops without this trick (origin).

    Browser considerations

    Me, I am by now taking it as a sign of quality if a server doesn't force https redirects and instead honours upgrade-insecure-requests. For instance, that way I can watch what some server speaks with the Javascript it executes on my machine without major hassle, and that's something that gives me a lot of peace of mind (but of course it's rather rare these days). In celebration of servers doing it right, I've configured my browser – luakit – to not send upgrade-insecure-requests; where I consider https a benefit rather than a liability for my privacy, I can remember switching to it myself, thank you.

    The way to do that is to drop a file no_https_upgrade_wm.lua into .config/luakit containing:

    local _M = {}
    
    luakit.add_signal("page-created",
        function(page)
            page:add_signal("send-request", function(p, _, headers)
                if headers["Upgrade-Insecure-Requests"] then
                    headers["Upgrade-Insecure-Requests"] = nil
                end
            end)
    end)
    

    (or fetch the file here). And then, in your rc.lua, write something like:

    require_web_module("no_https_upgrade_wm")
    

    ...and for bone-headed websites?

    In today's internet, it's quite likely that a given server will stink. As a matter of fact, since 1995, the part of the internet that stinks has consistently grown 20 percentage points[1] faster than the part that doesn't stink, which means that by now, essentially the entire internet stinks even though there's much more great stuff in it than there was in 1995: that's the miracle of exponential growth.

    But at least for escaping forced https redirects, there is a simple fix in that you can always run a reverse proxy to enable http on https-only services. I'm not 100% sure just how legal that is, but as long as you simply hand through traffic and it's not some page where cleartext on the wire can realistically hurt worse than the cleartext on the server side, I'd claim you're ethically in the green. So, to make the Deutsche Bahn connection finder work with python 2.5, all that was necessary was a suitable host name, an nginx, and a config file like this:

    server {
      listen 80;
      server_name bahnauskunft.tfiu.de;
    
      location / {
        proxy_pass https://reiseauskunft.bahn.de;
        proxy_set_header Host $host;
      }
    }
    
    [1]This figure is of course entirely made up<ESC>3bC only a conservative guess.
  • Bingo zur Wahl

    Bullshit Bingo-Karten zur Wahl

    Wer solche Bingo-Karten haben will: Das Wahlbingo-CGI macht sie euch gerne. Jeder Reload macht neue Karten!

    Auch wenn verschiedene Posts der letzten Zeit etwas anderes suggerieren mögen: Ich will gewiss nicht in die von Plakatwänden und aus Radiolautsprechern quellende Wahlaufregung einstimmen. Aber ein wenig freue ich mich doch auf die Bundestagswahl am nächsten Sonntag: ich kann nämlich wieder mein Wahlbingo spielen. Ihr kriegt bei jedem Reload der Bingo-Seite andere Karten, und zumindest Webkit-Browser sollten das auch so drucken, dass auf einer A4-Seite zwei Bingokarten rauskommen.

    Die Regeln sind dabei: Wer in der Wahlkampfberichterstattung eine hinreichend ähnliche Phrase aufschnappt, darf ein Feld abkreuzen (die Hälfte vom Spaß ist natürlich die lautstarke Klärung der Frage, ob eine Phrase ähnlich genug war). Wer zuerst vier…

    Nachtrag (2022-03-07)

    Die Erfahrung zeigt, dass es mit drei mehr Spaß macht.

    …Felder in horizonaler, vertikaler, oder diagonaler Richtung hat, hat gewonnen. Dabei gelten periodische Randbedingungen, mensch darf also über den Rand hinaus verlängern, als würde die eigene Karte die Ebene parkettieren.

    Das Ganze ist übrigens ein furchtbar schneller Hack an irgendeinm Wahlabend gewesen. Ich habe den gerade noch geschwinder für das Blog in ein CGI gewandelt. Wer darauf etwas Aufgeräumteres aufbauen will: die Quellen. Spenden für den Phrasenkorpus nehme ich sehr gerne per Mail.

  • Reading a zyTemp Carbon Dioxide Monitor using Tkinter on Linux

    Last weekend I had my first major in-person conference since the SARS-2 pandemic began: about 150 people congregated from all over Germany to quarrel and, more importantly, to settle quarrels. But it's still Corona, and thus the organisers put in place a whole bunch of disease control measures. A relatively minor of these was monitoring the CO2 levels in the conference hall as a proxy for how much aerosol may have accumulated. The monitor devices they got were powered by USB, and since I was sitting on the stage with a computer having USB ports anyway, I was asked to run (and keep an eye on) the CO2 monitor for that area.

    A photo of the CO2 meter

    The CO2 sensor I got my hands on. While it registers as a Holtek USB-zyTemp, on the back it says “TFA Dostmann Kat.Nr. 31.5006.02“. I suppose the German word for what's going on here is “Wertschöpfungskette“ (I'm not making this up. The word, I mean. Why there are so many companies involved I really can only guess).

    When plugging in the thing, my syslog[1] intriguingly said:

    usb 1-1: new low-speed USB device number 64 using xhci_hcd
    usb 1-1: New USB device found, idVendor=04d9, idProduct=a052, bcdDevice= 2.00
    usb 1-1: New USB device strings: Mfr=1, Product=2, SerialNumber=3
    usb 1-1: Product: USB-zyTemp
    usb 1-1: Manufacturer: Holtek
    usb 1-1: SerialNumber: 2.00
    hid-generic 0003:04D9:A052.006B: hiddev96: USB HID v1.10 Device [Holtek USB-zyTemp] on usb-0000:00:14.0-1/input0
    hid-generic 0003:04D9:A052.006C: hiddev96: USB HID v1.10 Device [Holtek USB-zyTemp] on usb-0000:00:14.0-1/input0
    

    So: The USB is not only there for power. The thing can actually talk to the computer. Using the protocol for human interface devices (HID, i.e., keyboards, mice, remote controls and such) perhaps is a bit funky for a measurement device, but, on closer reflection, fairly reasonable: just as the mouse reports changes in its position, the monitor reports changes in CO2 levels and temperatures of the air inside of it.

    Asking Duckduckgo for the USB id "04d9:a052" (be sure to make it a phrase search with the quotes our you'll be bombarded by pages on bitcoin scams) yields a blog post on decrypting the wire protocol and, even better, a github repo with a few modules of Python to read out values and do all kinds of things with them.

    However, I felt like the amount of code in that repo was a bit excessive for something that's in the league of what I call a classical 200 lines problem – meaning: a single Python script that works without any sort of installation should really do –, since all I wanted (for now) was a gadget that shows the current values plus a bit of history.

    Hence, I explanted and streamlined the core readout code and added some 100 lines of Tkinter to produce co2display.py3, showing an interface like this:

    A co2display screenshot

    This is how opening a window (the sharp drop of the curve on the left), then opening a second one (the even sharper drop following) and closing it again while staying in the room (the gentle slope on the right) looks like in co2display.py. In case it's not obvious: The current CO2 concentration was 420 ppm, and the temperature 23.8 degrees Centigrade (where I'm sure the thing doesn't measure to tenths of Kelvins; but then who cares about thenths of Kelvins?) when I took that screenshot.

    If you have devices like the zyTemp yourself, you can just download the program, install the python3-hid package (or its equivalent on non-Debian boxes) and run it; well, except that you need to make sure you can read the HID device nodes as non-root. The easiest way to do that is to (as root) create a file /etc/udev/rules.d/80-co2meter.rules containing:

    ATTR{idVendor}=="04d9", ATTR{idProduct}=="a052", SUBSYSTEM=="usb", MODE:="0666"
    

    This udev rule simply says that whenever a device with the respective ids is plugged in, any device node created will be world-readable and world-writable (and yeah, it does over-produce a bit[2]).

    After adding the rule, unplug and replug the device and then type python3 co2display.py3. Ah, yes, the startup (i.e., the display until actual data is available) probably could do with a bit of extra polish.

    First Observations

    I'm rather intrigued by the dynamics of CO2 levels measured in that way (where I've not attempted to estimates errors yet). In reasonably undisturbed nature at the end of the summer and during the day, I've seen 250 to 280 ppm, which would be consistent with mean global pre-industrial levels (which Wikipedia claims is about 280 ppm). I'm curious how this will evolve towards winter and next spring, as I'd guess Germany's temporal mean will hardly be below the global one of a bit more than 400 (again according to Wikipedia).

    In a basically empty train I've seen 350 ppm yesterday, a slightly stuffy train about 30% full was at 1015 ppm, about as much as I have in my office after something like an hour of work (anecdotically, I think half an hour of telecon makes for a comparable increase, but I can hardly believe that idle chat causes more CO2 production than heavy-duty thinking. Hm).

    On a balcony 10 m above a reasonably busy road (of order one car every 10 seconds) in a lightly built-up area I saw 330 ppm under mildly breezy conditions, dropping further to 300 as the wind picked up. Surprisingly, this didn't change as I went down to the street level. I can hardly wait for those winter days when the exhaust gases are strong in one's nose: I cannot imagine that won't be reflected in the CO2.

    The funkiest measurements I made on the way home from the meeting that got the device into my hands in the first place, where I bit the bullet and joined friends who had travelled their in a car (yikes!). While speeding down the Autobahn, depending on where I measured in the small car (a Mazda if I remember correctly) carrying four people, I found anything from 250 ppm near the ventilation flaps to 700 ppm around my head to 1000 ppm between the two rear passengers. And these values were rather stable as long as the windows were closed. Wow. Air flows in cars must be pretty tightly engineered.

    Technics

    If you look at the program code, you'll see that I'm basically polling the device:

    def _update(self):
      try:
        self._take_sample()
        ...
      finally:
        self.after(self.sample_interval, self._update)
    

    – that's how I usually do timed things in tkinter programs, where, as normal in GUI programming, there's an event loop external to your code and you cannot just say something like time.wait() or so.

    Polling is rarely pretty, but it's particularly inappropriate in this case, as the device (or so I think at this point) really sends data as it sees fit, and it clearly would be a lot better to just sit there and wait for its input. Additionally, _take_sample, written as it is, can take quite a bit of time, and during that time the UI is unresponsive, which in this case means that resizes and redraws don't take place.

    That latter problem could easily be fixed by pushing the I/O into a thread. But then this kind of thing is what select was invented for, or, these days, wrappers for it (or rather its friends) usually subsumed under “async programming“.

    However, marrying async and the Tkinter event loop is still painful, as evinced by this 2016 bug against tkinter. It's still open. Going properly async on the CO2monitor class in the program will still be the next thing to do, presumably using threads.

    Ah, that, and recovering from plugging the device out and in again, which would also improve behaviour as people suspend the machine.

    Apart from that, there's just one detail I should perhaps highlight in the code: The

    self.bind("<Configure>", lambda ev: self._update_plot())
    

    in the constructor. That makes the history plot re-scale if the UI is re-sized, and I've always found it a bit under-documented that <Configure> is the event to listen for in this situation. But perhaps that's just me.

    Nachtrag (2021-10-19)

    I've updated co2display.py3 as published here, since I've been hacking on it quite a bit in the meantime. In particular, if you rename the script co2log.py (or anything else with “log” in it), this will run as a plain logger (logging into /var/log/co2-levels by default), and there's a systemd unit at the end of the script that lets you run this automatically; send a HUP to the process to make it re-open its log; this may be useful together with logrotate if you let this run for weeks your months.

    You can also enable logging while letting the Tk UI run by passing a -d option …

  • Impfpass ohne App, Apple und Google

    Morgen werden zwei Wochen seit meiner zweiten Corona-Impfung vergangen sein. Damit wird die Impfpassfrage für mich relevant: Mit so einem Ding könnte ich wieder in die Mensa gehen!

    Allerdings habe ich, soweit ich das sehe, keinen Zugang zur offiziellen Covpass-App, weil ich mich von Apples Appstore und Googles Playstore fernhalte und eigentlich auch die Toolchains der beiden nicht auf meinem Rechner haben will. Immerhin gibt es (es lebe der Datenschutz-Aktivismus, der für offene Entwicklung von dem Kram gesorgt hat) die Quellen der Apps (wenn auch leider auf github). Wie kompliziert kann es schon sein, das ohne den ganzen proprietären Zauber nachzubauen?

    Stellt sich raus: schon etwas, aber es ist ein wenig wie eine Kurzgeschichte von H.P. Lovecraft: Die Story entwickelt sich wie beim Schälen einer Zwiebel. Schale um Schale zeigt sich, dass die Wahrheit immer noch tiefer liegt.

    Bei Lovecraft sind nach dem Abpulen der letzten Schale meist alle ProtagonistInnen tot oder wahnsinnig. Im Fall der Covpass-App hingegen ist der Kram sogar dokumentiert: So finden sich die halbwegs lesbare Dokumentation des Datenstroms im QR-Code und das JSON-Schema – leider schon wieder auf github.

    Schale 1: QR-Code scannen

    Ich dachte mir, zum Nachbauen der Covpass-App sollte ich erstmal ihre Eingabe verstehen, also die Daten aus den beiden Impfzertifikaten lesbar darstellen. Der erste Schritt dazu ist etwas, das QR-Codes lesen kann. Ich hatte anderweitig schon mit zbar gespielt, für das es das Debian-Paket python3-zbar gibt. Damit (und mit der unverwüstlichen Python Imaging Library aus python3-pillow) geht das so, wenn das Foto mit dem Zertifikat in der Datei foto.jpeg liegt:

    def get_single_qr_payload(img):
      img = img.convert("L")
    
      scanner = zbar.ImageScanner()
      scanner.parse_config('enable')
      image = zbar.Image(img.size[0], img.size[1], 'Y800', data=img.tobytes())
      if not scanner.scan(image):
        raise ValueError("No QR code found")
    
      decoded = list(image)
      if len(decoded)>1:
        raise ValueError("Multiple QR codes found")
    
      return decoded[0].data
    
    encoded_cert = get_single_qr_payload(Image.open("foto.jpeg"))
    

    Im Groben wandele ich in der Funktion das Bild (das wahrscheinlich in Farbe sein wird) in Graustufen, denn nur damit kommt zbar zurecht. Dann baue ich eine Scanner-Instanz, also das Ding, das nachher in Bildern nach QR-Codes sucht. Die API hier ist nicht besonders pythonesk, und ich habe längst vergessen, was parse_config('enable') eigentlich tut – egal, das ist gut abgehangene Software mit einem C-Kern, da motze ich nicht, noch nicht mal über diesen fourcc-Unsinn, mit dem vor allem im Umfeld von MPEG allerlei Medienformate bezeichnet werden; bei der Konstruktion des zbar.Image heißt „8 bit-Graustufen“ drum "Y800". Na ja.

    Der Rest der Funktion ist dann nur etwas Robustheit und wirft ValueErrors, wenn im Foto nicht genau ein QR-Code gefunden wurde. Auch hier ist die zbar-API vielleicht nicht ganz preiswürdig schön, aber nach dem Scan kann mensch über zbar.Image iterieren, was die verschiedenen gefundenen Barcodes zurückgibt, zusammen mit (aus meiner Sicht eher knappen) Metadaten. Das .data-Attribut ist der gelesene Kram, hier als richtiger String (im Gegensatz zu bytes, was ich hier nach der python3-Migration eher erwartet hätte).

    Schale 2: base45-Kodierung

    Das Ergebnis sieht nach üblichem in ASCII übersetzten Binärkram aus. Bei mir fängt der etwa (ich habe etwas manipuliert, das dürfte so also nicht dekodieren) so an: HC1:6B-ORN*TS0BI$ZDFRH%. Insgesamt sind das fast 600 Zeichen.

    Als ich im Wikipedia-Artikel zum Digitalen Impfnachweis gelesen habe, das seien base45-kodierte Daten, habe ich erst an einen Tippfehler gedacht und es mit base85 versucht, das es in Pythons base64-Modul gibt. Aber nein, weit gefehlt, das wird nichts. War eigentlich klar: die Wahrscheinlichkeit, dass was halbwegs Zufälliges base85-kodiert keine Kleinbuchstaben enthält, ist echt überschaubar. Und base45 gibts wirklich, seit erstem Juli in einem neuen RFC-Entwurf, der sich explizit auf QR-Codes bezieht. Hintergrund ist, dass der QR-Standard eine Kodierungsform (0010, alphanumeric mode) vorsieht, die immer zwei Zeichen in 11 bit packt und dafür nur (lateinische) Großbuchstaben, Ziffern und ein paar Sonderzeichen kann. Extra dafür ist base45 erfunden worden. Fragt mich bloß nicht, warum die Leute nicht einfach binäre QR-Codes verwenden.

    Es gibt bereits ein Python-Modul für base45, aber das ist noch nicht in Debian bullseye, und so habe ich mir den Spaß gemacht, selbst einen Dekodierer zu schreiben. Technisch baue ich das als aufrufbares (also mit einer __call__-Methode) Objekt, weil ich die nötigen Tabellen aus dem globalen Namensraum des Skripts draußenhalten wollte. Das ist natürlich ein Problem, das verschwindet, wenn sowas korrekt in ein eigenes Modul geht.

    Aber so gehts eben auch:

    class _B45Decoder:
      chars = "0123456789ABCDEFGHIJKLMNOPQRSTUVWXYZ $%*+-./:"
      code_for_char = dict((c, i) for i, c in enumerate(chars))
      sig_map = [1, 45, 45*45]
    
      def __call__(self, str):
        raw_bytes = [self.code_for_char[s] for s in str]
        cooked_bytes = []
    
        for offset in range(0, len(raw_bytes), 3):
          next_raw = raw_bytes[offset:offset+3]
          next_bytes = sum(w*v for w,v in
            zip(self.sig_map, next_raw))
          if len(next_raw)>2:
            cooked_bytes.append(next_bytes//256)
          cooked_bytes.append(next_bytes%256)
    
        return bytes(cooked_bytes)
    
    b45decode = _B45Decoder()
    

    Die b45decode-Funktion ist, wenn mensch so will, ein Singleton-Objekt der _B45Decoder-Klasse (so hätten das jedenfalls die IBMlerInnen der CovPass-App beschrieben, vgl. unten). Ansonsten bildet das den Grundgedanken von base45 ziemlich direkt ab: Immer drei Bytes werden zur Basis 45 interpretiert, wobei die Wertigkeit der verschiedenen Zeichen im Dictionary code_for_char liegt. Die resultierende Zahl lässt sich in zwei dekodierte Bytes aufteilen. Nur am Ende vom Bytestrom muss mensch aufpassen: Wenn die dekodierte Länge ungerade ist, stehen kodiert nur zwei Byte.

    Und ja: vielleicht wärs hübscher mit dem grouper-Rezept aus der itertools-Doku, aber die next_raw-Zuweisung schien mir klar genug.

    Schale 3: zlib

    Ein b45decode(encoded_cert) gibt erwartungsgemäß wilden Binärkram aus, etwas wie b'x\x9c\xbb\xd4\xe2\xbc\x90Qm!… Das sind, ganz wie die Wikipedia versprochen hat, zlib-komprimierte Daten. Ein zlib.decompress wirkt und führt auf etwas, in dem zum ersten Mal irgendetwas zu erkennen ist; neben viel Binärkram findet sich etwa:

    ...2bdtj2021-07-01bistRobert Koch-InstitutbmamOR...
    

    Keine Frage: Ich mache Fortschritte.

    Schale 4: CBOR/COSE

    An dieser Stelle bin ich auf mir unbekanntes Terrain vorgestoßen: CBOR, die Concise Binary Object Representation (Nerd-Humor: erfunden hat das Carsten Bormann, weshalb ich auch sicher bin, dass das Akronym vor der ausgeschriebenen Form kam) alias RFC 7049. Gedacht ist das als so eine Art binäres JSON; wo es auf die Größe so ankommt wie bei QR-Codes, habe ich schon Verständnis für diese Sorte Sparsamkeit. Dennoch: Sind Protocol Buffers eigentlich tot?

    Praktischerweise gibt es in bullseye das Paket python3-cbor2. Munter habe ich cbor2.loads(raw_payload) geschrieben und war doch etwas enttäuscht, als ich etwas wie:

    CBORTag(18, [b'\xa1\x01&',
      {4: b'^EVf\xa5\x1exW'},
      b'\xa4\x01bDE...',
      b'\xf9\xe9\x9f...'])
    

    zurückbekommen habe. Das ist deutlich mehr viel Binärrauschen als ich erhofft hatte. Aber richtig, das Zeug sollte ja signiert sein, damit die Leute sich ihre Impf- und Testzertifikate nicht einfach selbst schreiben. Die hier genutzte Norm heißt COSE (nämlich CBOR Object Signing and Encryption, RFC 8152 aus dem Jahr 2017). Ich habe das nicht wirklich gelesen, aber Abschnitt 2 verrät gleich mal, dass, wer an einer Signaturprüfung nicht interessiert ist (und das bin ich nicht, solange ich nicht vermuten muss, dass meine Apotheke mich betrogen hat), einfach nur aufs dritte Arrayelement schauen muss. Befriedigenderweise ist das auch das längste Element.

    Ein wenig neugierig war ich aber schon, was da noch so drinsteht. Die 18 aus dem CBORTag heißt nach Abschnitt 4.2, dass das eine Nachricht mit nur einer Unterschrift ist, und der letzte Binärkram ist eben diese eine Unterschrift. Das erste Array-Element sind Header, die mit unterschrieben werden, wieder CBOR-kodiert. Dekodiert ist das {1: -7}, und Überfliegen der COSE-Spezifikation (Tabellen 2 und 5) schlägt vor, dass das heißt: der Kram ist per ECDSA mit einem SHA-256-Hash unterschrieben.

    Tabelle 2 von COSE erklärt auch das nächste Element, die Header, die nicht unterschrieben werden (und über die mensch also Kram in die Nachrichten einfummeln könnte). Das sieht auch erstmal binär aus, ist aber ein „entpacktes“ Dictionary: In meiner Nachricht steht da nur ein Header 4, was der „Key Identifier“ ist. Der Binärkram ist schlicht eine 64-bit-Zahl, die angibt, mit welchem Schlüssel die Unterschrift gemacht wurde (bei PGP wären das die letzten 8 byte des Fingerabdrucks, viel anders wird das bei COSE auch nicht sein).

    Schale 5: CBOR lesbar machen

    Zurück zu den Zwiebelschalen. Wenn also die Nutzdaten im dritten Element des Array von oben sind, sage ich:

    cbor_payload = cbor2.loads(cose_payload.value[2])
    

    Heraus kommt dabei etwas wie:

    {1: 'DE', 4: 1657705736, 6: 1626169736,
    -260: {1: {'v': [{'co': 'DE', 'dn': 2, 'dt': '2021-07-01',
    'is': 'Robert Koch-Institut', 'ma': 'ORG-100030215',
    'mp': 'EU/1/20/1528', 'sd': 2, 'tg': '840539006',...}]}}}
    

    – das ist ziemlich offensichtlich die Datenstruktur, die der Zauber liefern sollte. Nur sind die Schlüssel wirklich unklar. v könnte wohl „Vaccination“ sein, is der Issuer, also der Herausgeber des Impfpasses; die Werte von 4 und 6 sehen verdächtig nach Unix-Timestamps in der nächsten Zeit aus (ja, es sind schon sowas wie 1,6 Milliarden Sekunden vergangen seit dem 1.1.1970).

    Aber Raten ist doof, wenn es Doku gibt. Wie komme ich also zu …

  • Javascript Local Storage

    Es gibt eine große Zahl gruseliger APIs (also: „Kram, den ein Programm tun kann“) in modernem Javascript, von Sensor APIs (zur Abfrage von Beschleunigung und Orientierung des Geräts und des Umgebungslichts) bis Websocket (mit dem weitgehend beliebige Server dauernd mit dem Client reden können, und das auch noch „im Hintergrund“ in Web Workers) – gruselig ist das, weil in aktuellen und nicht weiter modifizierten Browsern jede Webseite dieses Zeug nutzen kann, wobei eingestandenermaßen ein paar besonders dramatische APIs (Mikrofon und Kamera z.B.) noch durch Rückfragen abgesichert sind. Oh: Webseiten können das nicht nur nutzen, viel zu viele brauchen Javascript und gehen nicht, wenn mensch es abdreht.

    Der breite Zugriff auf fast alles von Javascript aus ist der Grund, warum ich des Öfteren ziemlich unwillig auf „please enable Javascript“-Banner (und noch mehr auf ihre Abwesenheit trotz Abhängigkeit von Javascript) reagiere. Javascript erlauben bedeutet spätestens seit XMLHTTPRequest (mit dem Javascript an der NutzerIn vorbei mit dem Ursprungsserver kommunizieren konnte; kam in der ersten Hälfte der Nullerjahre) und CORS (was XMLHTTPRequest und jetzt fetch auf beliebige Server ausweitete, solange die kooperieren; im Firefox tauchte das 2009 auf) einen recht weitgehenden Zugriff auf die eigene Maschine zu erlauben, und das noch ganz ohne Spectre und Freunde – die übrigens ohne ubiquitäres Javascript auf privaten Rechnern weitgehend bedeutungslos wären.

    Eine API, die ziemlich gruselig ist, weil sie Webseiten ein unendlich langes Gedächtnis in eurem Browser gibt, ist Local Storage; damit können Webseiten ernsthafte Datenmengen in eurem Browser speichern und sie wiederfinden, wenn sie das nächste Mal Javascript ausführen dürfen. Dass das zunächst lokal gespeichert wird, hilft nicht viel – per Websocket oder zur Not einem fetch mit Payload ist der Kram auch (wieder) auf jedem Server, der bereit ist, sich das anzuhören. Wohlgemerkt: ohne dass NutzerInnen irgendwas mitbekommen.

    Wenn ihr mein Gruseln nachfühlen wollt, könnt ihr hier mal Javascript einschalten (ihr lasst mich doch sonst kein Javascript ausführen, oder?). Ihr bekommt dann unter diesem Absatz ein Eingabefeld, in das ihr Kram tippen könnt. Wenn ihr einen hinreichend modernen Browser habt (technisch: er muss das storage-Signal schicken; Firefox 78 tut das z.B., Webkit 4.0.37 nicht), könnt ihr eure Nachricht in der Javascript-Warnung am Fuß der Seite sehen, schockierenderweise auch in anderen Fenstern, die ihr auf blog.tfiu.de offen habt. Auf allen halbwegs aktuellen Großbrowsern erscheint der Text jedenfalls nach dem nächsten Reload. Und bleibt auch da. Aufauf, schreibt eurem künftigen Selbst eine Nachricht in den Fuß dieser Seite:

    Gut. Du hast Javascript aus.

    Nennt mich paranoid, aber lustig ist das nicht.

    Und so ärgern mich noch viel mehr als Seiten, die Javascript fordern, Seiten, die ohne Local Storage leer bleiben oder sonst irgendwie undurchschaubar kaputt gehen.

    Was tun?

    Für die großen Browser gibt es allerlei Erweiterungen, die das Management von Local Storage erlauben; im Firefox sehe ich gerade Forget Me Not oder StoragErazor (was gleich noch die IndexedDB-API mit abdeckt, die ähnlich schrecklich ist, aber noch nicht viel genutzt wird); soweit ich erkennen kann, erlaubt das unverzichtbare noscript nicht, Javascript ohne Local Storage laufen zu lassen.

    Für meinen Haupt-Browser, den Luakit (verdammt, schon wieder ein Link von hier in github rein), habe ich eine kleine Erweiterung geschrieben, mit der ich mit der Tastenkombination ,tq schnell local storage ein- und ausschalten kann; auf die Weise kann ich normalerweise ohne Local Storage browsen, wenn dann aber mal wirklich eine Seite kaputt ist (gitlab ist da derzeit so ein ganz schlechtes Beispiel), braucht es nur ein paar Anschläge. Eine Anzeige in der Fußleiste (q/Q für Storage aus/an) kommt auch mit:

    -- Web storage control
    
    -- @module webstorage_control
    -- @copyright Public Domain
    
    local _M = {}
    
    local window = require("window")
    local theme = require("theme")
    local settings = require("settings")
    local modes = require("modes")
    local add_binds = modes.add_binds
    
    function update_webstorage_disp(w)
        if settings.get_setting("webview.enable_html5_database") then
            w.sbar.r.webstorage_d.text = "Q"
        else
            w.sbar.r.webstorage_d.text = "q"
        end
    end
    
    function toggle_local_storage(w)
        local local_storage_enabled =
            settings.get_setting("webview.enable_html5_database")
    
        settings.set_setting("webview.enable_html5_database",
            not local_storage_enabled)
        settings.set_setting("webview.enable_html5_local_storage",
            not local_storage_enabled)
        update_webstorage_disp(w)
    end
    
    window.add_signal("init", function (w)
        local r = w.sbar.r
        r.webstorage_d = widget{type="label"}
        r.layout:pack(r.webstorage_d)
        r.layout:reorder(r.webstorage_d, 1)
        r.webstorage_d.font = theme.font
        update_webstorage_disp(w)
    end)
    
    add_binds("normal", {
        { "^,tq$", "Enable/disable web local storage", toggle_local_storage},
    })
    
    return _M
    
    -- vim: et:sw=4:ts=8:sts=4:tw=80
    

    Wer auch den luakit verwendet, kann das nach .config/luakit/webstorage_control.lua packen und dann:

    require("webstorage_control")
    

    an geeigneter Stelle (z.B. in .config/luakit/rc.lua) unterbringen. Wenn dermaleinst so viele Seiten ohne Local Storage kaputtgehen wie derzeit ohne Javascript, müsste das wahrscheinlich eher wie in der noscript-Erweiterung automatisiert werden.

    Auch wenn ich mal Local Storage erlaube, will ich natürlich nicht, dass der Kram persistent bleibt. Deshalb habe ich noch folgendes kleine Python-Programm geschrieben:

    #!/usr/bin/python
    """
    Clear luakit web local storage and cookies
    
    There's a whitelist applied to both.
    """
    
    
    import fnmatch
    import glob
    import os
    import re
    import sqlite3
    
    
    class Whitelist:
        """A fnmatch-based whitelist.
    
        Test as in "domain in whitelist".  It's not fast, though.
        """
        def __init__(self,
                src_path=os.path.expanduser("~/.config/luakit/cookie.whitelist")):
            with open(src_path) as f:
                self.patterns = [s.strip() for s in f.read().split("\n")]
    
        def __contains__(self, domain):
            for pattern in self.patterns:
                if fnmatch.fnmatch(domain, pattern):
                    return True
            return False
    
    
    def clear_cookies(whitelist):
        """removes cookies from domains not in whitelist from luakit's
        cookies db.
        """
        conn = sqlite3.connect(
            os.path.expanduser("~/.local/share/luakit/cookies.db"))
    
        try:
            all_hosts = list(r[0]
                for r in conn.execute("select distinct host from moz_cookies"))
            for host in all_hosts:
                if host in whitelist:
                    continue
                conn.execute("delete from moz_cookies where host=?",
                    (host,))
        finally:
            conn.commit()
            conn.execute("VACUUM")
            conn.close()
    
    
    def try_unlink(f_name):
        """removes f_name if it exists.
        """
        if os.path.exists(f_name):
            os.unlink(f_name)
    
    
    def clear_local_storage(whitelist):
        """removes luakit's local storage files unless their source
        domains are whitelisted for cookies.
        """
        for f_name in glob.glob(os.path.expanduser(
                "~/.local/share/luakit/local_storage/*.localstorage")):
            mat = re.match("https?_(.*?)_\d+.localstorage",
                os.path.basename(f_name))
            if not mat:
                print("{}???".format(f_name))
                continue
    
            if mat.group(1) in whitelist:
                continue
    
            try_unlink(f_name)
            try_unlink(f_name+"-shm")
            try_unlink(f_name+"-wal")
    
    
    def main():
        whitelist = Whitelist()
        clear_cookies(whitelist)
        clear_local_storage(whitelist)
    
    
    if __name__=="__main__":
        main()
    

    Das Programm liest eine Liste von Shell-Patterns (also etwas wie *.xkcd.com) aus einer Datei ~/.config/luakit/cookie.whitelist und löscht dann alle Cookies und Local Storage-Einträge im Luakit, die nicht von Servern kommen, die in dieser Ausnahmeliste erwähnt sind. Das Ganze läuft bei mir jeden Morgen aus meiner Crontab:

    01 09 * * * ~/mybin/clear_luakit_cookies.py
    

    Aber: Besser wärs, das wäre alles nicht da. In einem Browser, also etwas, mit dem mensch Webseiten anschauen will, hat eine API wie Local Storage mit Persistenz und Signalisierung eigentlich nichts verloren.

    Oh: Der Javascript-Quellcode für den ganzen Spaß mit euren Notizen in der Fußzeile ist erschreckend klein. Für den Fall, dass ich das mal anders schreibe und das so nicht mehr im Seiten-Quellcode zu finden sein wird, hier zunächst der Code für das Eingabefeld oben:

    <div id="textarea-container">
      <p><em>Gut.  Du hast Javascript aus.
      </em></p>
    </div>
    
    <script deferred="deferred">
      function setUp() {
        document.querySelector("#textarea-container").innerHTML =
          `<textarea id="to-store" style="width:100%; height:6cm"
          placeholder="Tippt kram, den ihr im Fuß der Seite sehen wollt."
          ></textarea>`;
        let textSource = document.querySelector("#to-store");
        if (!window.localStorage) {
          textSource.value = "Ah, gut.  Du hast local storage aus.  Dann\n"
            +"geht das hier nicht.  Wie gesagt, das ist gut.";
           return;
        }
    
        if (window.localStorage.savedText) {
          textSource.value = window.localStorage.getItem("savedText");
        }
    
        textSource.addEventListener("input", () => {
          window.localStorage.setItem("savedText", textSource.value);
        });
    
        window.addEventListener("storage", (ev) => {
          textSource.value = ev.newValue;
        });
      }
    
      setUp();
    </script>
    

    Und dann noch der fürs Management der Fußzeile (der sitzt jetzt gerade im head-Element):

    if (window.localStorage) {
      target.innerHTML +=
        `<div id="ls-warning"><p><strong>Schlimmer noch:</strong>
        Dein Browser lässt mich
        auch local storage machen.  Wenn du dir in
        <a href="/javascript-local-storage.html">diesem Artikel</a>
        eine Nachricht hinterlässt, bekommst du sie bei deinem nächsten
        Besuch unten zu sehen; du kannst da sogar dein eigenes
        HTML und Javascript unterbringen und ausführen lassen.</p>
        <p id="user-message"/></div>`;
    
      if (window.localStorage.savedText) {
        document.querySelector("#user-message").innerHTML =
          window.localStorage.savedText;
      }
    
      window.addEventListener("storage", (ev) => {
        document.querySelector("#user-message").innerHTML = ev.newValue;
      });
    }
    
  • Geistesgegenwart um Mitternacht: Tut sie aber nicht

    Ich bin ja eigentlich niemand, der „Handarbeit“ als Qualitätsprädikat sonderlich schätzt, aber es ist gerade bei Radio schön, wenn sich zeigt, dass der Kram zwar aus dem Computer kommt, aber doch noch Menschen vor dem Computer sitzen.

    So ging das am letzten Samstag (3.7.), kurz nach Mitternacht. Mein Rechner schneidet da immer den Mitternachtskrimi aus dem Live-Programm des Deutschlandfunks mit und hat dabei dieses großartige Stolpern aufgenommen:

    (um die Bediengeräusche besser herauszubringen, habe ich das Audio etwas komprimiert). Ich muss sagen, dieses kurze Selbstgespräch fand ich sehr beeindruckend – und ich habe mich wiedererkannt, denn in dieser Sorte experimentellen Diskurses mit der Maschine versuche auch ich mich dann und wann.

    Zu diesem schönen Ausschnitt habe ich zwei Einwürfe zu bieten.

    Erstens war die dann doch noch folgende Sendung eine leicht expressionistische Hörspielfassung des Kleist-Klassikers Das Erdbeben in Chili, die ich hier liebend gerne verteilen würde, weil sie schön zeigt, was für ein garstiges Gift reaktionäre Hetzerei ist; ich kann mir nur schwer vorstellen, dass, wer das gehört hat, noch auf das Gift von, sagen wir, Innenminister Seehofer hereinfallen könnte.

    Aber nun, das Urheberrecht hindert mich daran, was mein Argument von neulich gegen das „geistige Eigentum“ schön illustriert: Das Hörspiel, vermutlich eine öffentlich-rechtliche Produktion, gäbe es natürlich auch, wenn ich es jetzt verteilen dürfte, und die Leute, die das damals gemacht haben, sind hoffentlich schon dabei ordentlich bezahlt worden und werden kaum auf ein paar Cent für einen Download durch euch angewiesen sein. Die Existenz des Textes hat offensichtlich nichts mit Urheberrecht zu tun, denn zu Kleists Zeiten gab es gar keins. Hier wirken die heutigen („Post-Micky-Maus“) Regelungen diametral gegen den ursprünglichen Zweck des Urheberrechts, nämlich, der Gesellschaft eine möglichst reichhaltige Kultur zur Verfügung zu stellen.

    Der zweite Einwurf: Über die vergangenen 20 Jahre hatte ich verschiedene Hacks, um Radio-Streams mitzuschneiden – ich schaudere, wenn ich an die schlimmen Tage von RealAudio und das Rausfummeln des Signals über preloaded libraries zurückdenke, die das write der libc überschrieben haben. Nun, der proprietäre Client wollte kein Speichern der Streams zulassen (schon wieder das Copyright-Gift!).

    Inzwischen ist das Mitschneiden dank ffmpeg und offener Standards auf der Seite der Radiostationen nur noch ein schlichtes Shellscript. Ich verwende seit ein paar Jahren das hier:

    #!/bin/bash
    
    if [ ! $# -eq 3 ]; then
            echo "Usage $0 time-to-record m3u-url output-file"
            exit 1
    fi
    
    
    case "$2" in
            dlfhq)
                    stream=https://st01.sslstream.dlf.de/dlf/01/high/opus/stream.opus
                    oopts=""
                    ;;
            dlf)
                    stream=https://st01.sslstream.dlf.de/dlf/01/low/opus/stream.opus
                    oopts="-ac 1 -ar 22500"
                    ;;
            dradio)
                    stream=`curl -s http://www.deutschlandradio.de/streaming/dkultur_lq_ogg.m3u | head`
                    ;;
            *)
                    stream="$2"
                    ;;
    esac
    
    ffmpeg -y -nostdin -loglevel error -i "$stream"  $oopts -start_at_zero -to $1  -c:a libvorbis "$3"
    

    (wahrscheinlich ist die dradio-Regel kaputt, aber das ist sicher leicht repariert). Das lege ich an eine passende Stelle, und cron sorgt für den Rest. Die crontab-Zeile, die mir schon viele Mitternachtskrimis und eben auch die Perle von oben mitgeschnitten hat, sieht so aus:

    05 00 * * sat /path/to/oggsnarf 1:00:00 dlf ~/media/incoming/mitternachtskrimi`date +\%Y\%m\%d`.ogg
    

    Nachtrag (2021-11-01)

    Nach ein paar Monaten fällt mir auf, dass nur ganz kurz nach diesem Post und meiner zustimmenden Erwähnung der Mitternachtskrimis (die allerdings schon damals zu „blue crime“ geworden waren) der Deutschlandfunk den seit mindestens meiner späten Kindheit den Krimis gehörenden Programmplatz am Samstag um 0:05 auf aktuelle Kulturberichterstattung („Fazit“) umgewidmet hat. Die Crontab-Zeile hat also nicht mehr viel Wert (und ist längst aus meiner crontab verschwunden). Ich glaube, die Idee der ProgrammplanerInnen wird gewesen sein, den Krimi Hörspiel-Podcast als Ersatz anzubieten.

  • Bluetooth tethering with a 2021 Debian

    The other day the cage that holds the SIM card for the wireless modem of my Lenovo X240 rotted away. Fixing this (provided that's even reasonable, which I'm not sure about) requires digging quite a bit deeper into the machine than I consider proportional for something I use less than once a month. Plus, there's still my trusty N900 cellphone that I can use for the occasional GSM (or, where still available, UMTS) data connection.

    A SIM card cage on a table

    The underlying reason for mucking around tethering bluetooth in 2021: the cage for the SIM card in my computer rotted out. And re-attaching it to the mainboard looks like surgery to deep for summer.

    So, I revived the ancient scripts I used to use around 2005 with feature phones playing cell modem and tried to adapt them to the N900. Ouch.

    Well, full disclosure: I have only hazy notions about what's going on in bluetooth in general, and the Linux tooling for bluetooth I find badly confusing. Hence, rather than reading manpages I started asking duckduckgo for recipes for “bluetooth tethering linux“ or similar. And since what I found was either rather outdated or used various GUI and network management tools I prefer to not have to regularly run, let me write up what I ended up doing to thether my Debian box. Oh: it's using ifupdown and is Debian-specific in that sense, but otherwise I think it's fairly distribution-neutral, contrary to what you might expect after the headline.

    The bluetooth part

    The basic operation for bluetooth tethering is straightforward: Open a serial-like connection (“rfcomm”) to the phone, then start a pppd on top of it. It's the little details that make this tricky.

    The first detail for me is that I have a deep distrust of bluez (and even the bluetooth drivers). I hence keep bluetooth off and blocked most of the time, and before opening any bluetooth connection, I have to manage this bluetooth state, which I'm going to do in a plain shell script. I'm sure there's a very elegant way to do this in systemd, but then I'd say this is a case where the clarity of a shell script is hard to beat.

    So, I created a file /usr/local/sbin/bluenet containing this:

    #!/bin/sh
    # Configure/deconfigure an rfcomm bluetooth connection
    
    DEVICE_MAC=<YOUR PHONE'S BLUETOOTH ID>
    
    case $1 in
      start)
        /usr/sbin/rfkill unblock bluetooth
        /sbin/modprobe btusb
        /usr/sbin/service bluetooth start
        /usr/bin/rfcomm bind /dev/rfcomm0  $DEVICE_MAC
        sleep 2 # no idea what I should really be waiting for here, but
          # bluetooth clearly needs some time to shake out
        ;;
      stop)
        /usr/bin/rfcomm release /dev/rfcomm0
        /usr/sbin/service bluetooth stop
        /sbin/rmmod btusb
        /usr/sbin/rfkill block bluetooth
        ;;
      default)
        echo "$1 start|stop"
        exit 1
    esac
    

    All that you really need if you don't mind having bluetooth on are the two rfcomm command lines; the advantage of having this in a separate script (rather than just hack the rfcomm calls into the ifupdown stanza) is that you can say bluenet stop after a failed connection attempt and don't have to remember what exactly you started and what the stupid rfcomm command line was. Oh: Resist the temptation to keep this script in your home directory; it will be executed as root by ifupdown and should not be writable by your normal user.

    To figure out your phone's bluetooth id, I think what people generally use these days is bluetoothctl (and for interactive use, it's fairly nice, if scantily documented). Essentially, you say scan on in there and wait until you see something looking like your phone (you'll have to temporarily make it discoverable for that, of course). While you're in there, run pair <mac>, too – at least for me, that was really straightforward compared to the hoops you had to jump through to pair bluetooth devices in Linux in the mid-2000s.

    With this, you should be able to say:

    sudo /usr/local/sbin/bluenet start
    

    and then talk to a modem on /dev/rfcomm0. Try it with a terminal program:

    minicom -D /dev/rfcomm0
    

    In minicom, type AT and return, and try again if it doesn't work on the first attempt[1]; the phone should respond with OK. If it does, you're essentially in business. If it doesn't, try rfcomm -a – which should show something like:

    rfcomm0: DE:VI:CE:MA:CA:DD:RE channel 1 clean
    

    Oh, and bluetootctl may be your (slightly twisted) friend; in particular info <mac> has helped me figure out problems. I still don't understand why my N900 doesn't show the rfcomm capability in there, though – again, I'm not nearly enough of a bluetooth buff to tell if that's normal in any way.

    The PPP part

    Assuming, on the other hand, you have your rfcomm connection, the rest is standard pppd fare (which, of course, makes me feel young again). This means you have to give a provider-specific pppd configuration, conventionally in /etc/ppp/peers/bluez (replace bluez with whatever you like), which for me looks like this:

    /dev/rfcomm0
    115200
    debug
    noauth
    usepeerdns
    receive-all
    ipcp-accept-remote
    ipcp-accept-local
    local
    nocrtscts
    defaultroute
    noipdefault
    noipv6
    connect "/usr/sbin/chat -v -f /etc/ppp/chat-bluez"
    
    lcp-echo-interval 300
    lcp-echo-failure 10
    

    Some of this is a good idea whenever there's not actually a serial port in the game (local, noctsrts), some may break your setup (noauth, though I think that's fairly normal today), and the lcp-echo things I found useful to detect lost connections, which of course are rather common on cellular data. Oh, and then there's the noipv6 that you may object to.

    Anyway: you may need to gently adapt your pppd peers file. Use your common sense and browse the pppd man page if you can't help it.

    The chat script /etc/ppp/chat-bluez mentioned in the peers file for me (who's using a German E-Netz reseller) looks like this:

    TIMEOUT 5
    ECHO ON
    ABORT 'ERROR'
    ABORT 'NO ANSWER'
    ABORT 'NO CARRIER'
    ABORT 'NO DIALTONE'
    '' "ATZ"
    OK-ATZ-OK ATE1
    OK 'AT+CGDCONT=1,"IP","internet.eplus.de","0.0.0.0"'
    TIMEOUT 15
    OK "ATD*99***1#"
    CONNECT ""
    

    Essentially I'm doing a modem reset (ATZ), and (to accomodate for the swallowed initial characters mentioned above) I'm trying again if the first attempt failed. The ATE1 enables echo mode to help debugging, and then comes the magic in the CGDCONT (“Define packet data protocol (PDP) context”) AT command – you will have to adapt at least the string internet.eplus.de to your provider's APN (there are public lists of those). The rest you can probably keep as-is; nobody really uses more than one profile (the 1) or a PDP type other than IP (well, there IPV4V6 that might interest you if you've removed the noipv6 statement above), or uses the PDP address in the last argument.

    The final dial command (the ATD) is, I think, fairly standard (it says, essentially: Call the PDP context 1 set up in CGDCONT).

    All this assumes your provider does not require authentication; I think most don't these days. If they do, say hello to /etc/ppp/pap-secrets and the pppd manpage (you have my sympathy).

    Finally, the various components are assembled in a stanza in /etc/network/interfaces:

    iface n900 inet ppp
      pre-up /usr/local/sbin/bluenet start
      provider bluez
      post-down /usr/local/sbin/bluenet stop
    

    That's it – your tethered network should now come up with ifup n900, and you can take it down with ifdown n900. If the thing gets stuck, meaning the interface won't come up as far as Debian is concerned, the post-down action will not be run. Just run bluenet stop manually in that case.

    Amazing endurance

    One thing blew my mind when I did this: A good decade ago, the Nokia N900 didn't come with the profile rfcomm uses enabled (it's called “DUN” there; don't ask me why). It didn't need much to enable it, but you needed to drop some magic file for the upstart init system running in the N900's maemo into some strategic location, and some kind soul had packaged that up. Not expecting much I simply ran apt-get install bluetooth-dun – and it just worked. Whoever still keeps up these ancient maemo repositories: Thanks a lot, and I'm impressed. If we ever meet, remind be to buy you a $BEVERAGE.

    [1]In the communication with the N900 with its ancient bluetooth stack, for some reason the first character(s) tend to get swallowed somewhere on the way. I've not tried to ascertain who is to blame; perhaps it's the autoconnection of rfcomm?
  • udev, thinkpad docks, sawfish

    The other day someone gave me another dock for my thinkpad, and I eventually decided to use it at home. I've had a dock at the office for a long time, and docking there involved running a complex script configuring the network environment, running a window manager on some display on a desktop machine, and only exiting when the dock was supposed to end; its execution was triggered when the wake-up script noticed a dock was present.

    Now, when there are two docks and one is for rather conventional at-home use (essentially, simply configuring a different monitor and network adapter), I decided to do it properly and go through udev. Which turned out to be tricky enough that I'll turn this note to my future self into a blog post.

    udev

    What turned out to be the most complicated part was figuring out the udev rules. That's because for ages I have been using:

    udevadm info -a -p some/sysfs/path
    

    to work out matchable attributes for a device. That's more or less fine if all you're after is rules for attaching devices. For the dock, however, the removal event is important, too. But when the removal event comes in, udev has forgotten essentially all of the attributes that come from info -a, and rules that work with add simply won't fire with remove.

    So, here's my new policy: I'll use:

    udevadm monitor --environment --udev
    

    (where the udev option restricts events to udev rather than kernel events, which for the deluge of events coming from the dock seemed smart; I may want to revisit that). When you then plug in or out things, you'll directly see what events you can match against. Nice.

    Except of course for the deluge of events just mentioned: A dock just has quite a few devices. The event for the device I consider most characteristic, however, makes two add events, and I've not found a good way to tell the two of them apart. Still, this is what I've put into /etc/udev/rules.d/95-docking.rules:

    ACTION=="add", SUBSYSTEM=="usb", ENV{ID_VENDOR_ID}=="17ef", \
      ENV{ID_MODEL_ID}=="1010",  ENV{DEVTYPE}=="usb_device", \
      RUN+="/bin/su <your user id> -c '/full-path-to-dock-script start'"
    
    ACTION=="remove",  ENV{SUBSYSTEM}=="usb", ENV{PRODUCT}=="17ef/1010/5040", \
      ENV{DEVTYPE}=="usb_device", \
      RUN+="/bin/su <your user id> -c '/full-path-to-dock-script stop'"
    

    Important (and having forgotten about it again gave me quite a bit of frustration): Rather sensibly, udev has no idea of the shell path and will just fail silently when it cannot execute what's in RUN. Hence you must (essentially) always give full path names in udev RUN actions. In case of doubt, try RUN+="/usr/bin/logger 'rule fires'" in a rule and watch the syslog.

    For this kind of thing, by the way, you'll rather certainly want to use su (or go through policykit, but I can't bring mayself to like it). You see, I want the dock script in my home directory and owned by me; having such a thing be executed as root (which udev does) would be a nice backdoor for emergencies, but will generally count as a bad idea.

    On the double dock event… well, we're dealing with shell scripts here, so we'll hack around it.

    Dock script: sawfish to the rescue

    udev only lets you execute short scripts these days and rigorously kills everything spawned from udev rules when it has finished processing the events. I suppose that's a good policy for general system stability and reducing unpleasant surprises. But for little hacks like the one I'm after here, it seems to be a bit of a pain at first.

    What it means in practice is that you need something else to execute the actual dock script. In my case, that thing is my window manager, sawfish, and having the window manager do this is rather satisfying, which reinforces my positive feeling towards udev's kill policy (although, truth be told, the actual implemenation is in shell rather than in sawfish's scheme).

    To keep everything nicely together, the docking script at its core is a bash case statement, in essence:

    !/bin/bash
    # bookkeeping: we need to undock if that file is present
    UNDOCK_FILE=~/.do-undock
    
    # display for the window manager we talk to
    export DISPLAY=:0
    
    case $1 in
      start)
        sawfish-client -c "(system \"urxvt -geometry -0+0 -e $0 on &\")"
        ;;
      stop)
        sawfish-client -c "(system \"urxvt -geometry -0+0 -e $0 off &\")"
        ;;
      on)
        if [[ -f $UNDOCK_FILE &&
          $((`date +"%s"` - `date -r $UNDOCK_FILE +"%s"`)) -lt 20 ]]; then
            # debounce multiple dock requests
           exit 1
        fi
        touch $UNDOCK_FILE
    
        # let udev do its thing first; we're no longer running from udev
        # when we're here.
        udevadm settle
    
        # Commands to dock follow here
        ;;
      off)
        if [ -f ~/.do-undock ]; then
          rm ~/.do-undock
          # Commands to undock in here.
        fi
        ;;
      *)
        echo "Usage $0 (start|stop|on|off)"
        ;;
    esac
    

    The plan is: Udev calls the script with start and stop, which then arranges for sawfish to call the script from sawfish with the on and off arguments.

    There's a bit of bookkeeping with a file in home I keep to see whether we need to undock (in my setup, that's not necessary at work), and which I use to unbounce the duplicate dock request from udev. That part could be improved by using lockfile(1), because the way it is written right now there are race conditions (between the -f, the date, and the touch) – perhaps I'll do it when next I have time budgeted for OS fiddling.

    One think I like a lot is the udevadm settle; this basically lets my script rely on a defined state where all the devices it may want to talk to are guaranteed to be initialised as far as udev goes. This is so much nicer than that sleep 3 you can see in too many places.

    What I do when docking

    Why go into all this trouble and not let whatever automagic is active pick up the screen and the new network interface and be done with it? Well, partly because I don't run most of the software that does that magic. But of course having a shell script lets me say what I actually want:

    • disable sleep on lid closing (that's special to my own ACPI hacks from the depths of time)
    • configure the the external screen as primary (that's something like xrandr --output DP2-1 --off ; xrandr --fb 2048x1152 --output DP2-1 --auto for me; don't ask why I first need to switch off the display, but without it the --auto will get confused).
    • switch to an empty (“dock-only” if you will) page on the desktop (that's wmctrl -o 4096,1152 for me).
    • sure enough, switch on some desktop glitz that I'm too stingy for when off the grid.

    One thing I'm currently doing in the dock script that I shouldn't be doing there: I'm now using a wacom bamboo pad I've inherited as a mouse replacement at home and was suprised that no middle mouse button (Button2) was configured automatically on it. Perhaps some search engine will pick this up and save a poor soul looking for a quick solution reading man pages and xsetwacom output:

    xsetwacom set "Wacom BambooPT 2FG 4x5 Pad pad" Button 8 2
    xsetwacom set "Wacom BambooPT 2FG 4x5 Pad pad" Button 9 2
    

    (this makes both buttons in the middle middle mouse buttons; I'll see if I like that on the long run). Of course, in the end, these lines belong into a udev rule for the wacom tablet rather than a dock script. See above on these.

  • Mailman3: "Cannot connect to SMTP server localhost on port 25"

    I've been a fairly happy mailman user for about 20 years, and I ran mailman installations for about a decade in the 2000s.

    Over the last week or so, I've spent more time setting up a mailman3 list off and on than I've spent with mailman guts in all the years before, which includes recovery form one or two bad spam attacks. Welcome to the brave new world of frameworks and microservices.

    Perhaps the following words of warning can help other mailman3 deployers to not waste quite as much time.

    Badly Misleading Error Messages

    Most importantly, whatever you do, never call mailman as root. This will mess up permissions and lead to situations really hard to debug. In particular, the error message from the post's title:

    Cannot connect to SMTP server localhost on port 25
    

    apparently can have many reasons (or so the recipes you find on the net suggest), few of which have anything to do with SMTP, but one clearly is when mailman can't read or write to queue files or templates or whatever and bombs out while trying to submit mail.

    Morale: Don't claim too much when writing error messages in your programs.

    Unfortunately, I've fixed the thing accidentally, so I can't say what exactly broke. The take away still is that, in Debian (other installations' mailman users might be called something else) you run mailman like this:

    sudo -u list mailman
    

    However, I can now say how to go about debugging problems like these, at least when you can afford a bit of mailman unavailability. First, stop the mailman3 daemon, because you want to run the thing in the foreground. Then set a breakpoint in deliver.py by inserting, right after def deliver(mlist, msg, msgdata), something like:

    import pdb; pdb.set_trace()
    

    Assuming Debian packaging, you will find that file in /usr/lib/python3/dist-packages/mailman/mta.

    Of course, you'll now need to talk to the debugger, so you'll have to run mailman in the foreground. To do that, call (perhaps adapting the path):

    sudo -u list /usr/lib/mailman3/bin/master
    

    From somewhere else, send the mail that should make it to the mail server, and you'll be dropped into the python debugger, where you can step until where the thing actually fails. Don't forget to remove the PDB call again, as it will itself cause funky errors when it triggers in the daemonised mailman. Of course, apt reinstall mailman3 will restore the original source, too.

    Template Management Half-Broken

    When I overrode the welcome message for a mailing list, the subscription notifications to the subscribing users came out empty.

    This time, there was at least something halfway sensible in the log:

    requests.exceptions.HTTPError: 404 Client Error: Not Found for url: http://localhost/postorius/api/templates/list/kal.sofo-hd.de/list:user:notice:welcome
    

    Until you read up on the mailman3 system of managing templates (which, roughly, is: store URIs from where to pull them), it's a bit mystifying why mailman should even try this URI. Eventually, one can work out that when you configure these templates from Postorius, it will take the URI at which mailman should see it, Postorius, from POSTORIUS_TEMPLATE_BASE_URL in /etc/mailman/mailman-web.py. This is preconfigured to the localhost URI, which proabably only rarely is right.

    To fix it, change that setting to:

    POSTORIUS_TEMPLATE_BASE_URL = 'http://<your postorious vserver>/postorius/api/templates/'
    

    Of course it'll still not work because the old, wrong, URI is still in mailman's configuration. So, you'll have to go back to the template configuration in Postorius and at least re-save the template. Interestingly, that didn't seem to fix it for me for reasons I've not bothered to fathom. What worked was deleting the template and re-adding it. Sigh.

    As soon as you have more than one template, I expect it's faster to change the URIs directly in mailman's database, which isn't hard, as seen in the next section.

    [Incidentally: does anyone know what the dire warnings in the docs about not using sqlite3 on “production” systems actually are about?]

    Disable Emergency Moderation After Moving

    Basically because I was hoping to get a more controlled migration, I had set one list on the old server to emergency moderation before pulling the config.pck. Don't do that, because at least as of now mailman3 has the notion of emergency moderation but makes it hard to switch it on or off. I eventually resorted to directly touching mailman's config database (if you've configured mailman to use something else than sqlite, the shell command is different, but the query should be the same):

    $ sudo -u list sqlite3 /var/lib/mailman3/data/mailman.db
    [on the sqlite prompt:]
    update mailinglist set emergency=0 where list_id='<your list id>';
    

    Note that <your list id> has a dot instead of the at, so if your list is mylist@example.org, its id is mylist.example.org.

    Oh No, CSRF Token

    The list I cared about most could be joined from an external web site, transparently posting to mailman2's cgi-bin/mailman/subscribe (oh! CGI! How am I missing you in the age of uwsgi and Django!). Looking at its counterpart for modern mailman3, the first thing I noted is that there's a CSRF token in it – if you've not encountered them before, it's a couple of bytes the originating server puts into a web form to prevent what Postorius' authors feels is Cross Site Request Forgery.

    Of course, what I wanted was exactly that: Post to Postorius from a different web site. I don't feel that's forgery, very frankly.

    I didn't see an obvious way to turn it off, and I was a bit curious about mailman3's own http API, so I wrote a few lines of code to do this; the API part itself was straightforward enough, something like:

    result = requests.post(
      getConfig("mailmanAPI")+"/members", {
        'list_id': getConfig("mailmanListname"),
        'subscriber': toSubscribe,
        'pre_verified': False,
        'pre_confirmed': False,
        'pre_approved': True,},
      auth=(getConfig("mailmanAPIUser"),
        getConfig("mailmanAPIPassword")),
      timeout=1)
    

    – but of course it sucks a bit that subscribing someone requires the same privilege level as, say, creating a mailing list or changing its description. And all that just to work around CSRF prevention. Sigh.

    On top of that, I've tried K-SAT on the pre_X booleans to try and see if anything gives me the tried and tested workflow of “let folks enter a mail address, send a confirmation link there, subscribe them when it's being clicked“. No luck. Well, let's hope the pranksters don't hit this server until I figure out how to do this.


    Hm. I think I'm a bit too locked in into mailman to migrate away, but I have to say I wish someone would port mailman2 to python3 and thus let mailman2 hang on essentially forever. It did all a mailing list manager needs to do as far as I am concerned, and while it wasn't pretty with the default browser stylesheets, even now, almost a decade into mailman3, it works a whole lot more smoothly.

    Or perhaps there's a space for a new mailing list manager with a trivially deployable web interface not requiring two separate database connections? Perhaps such a thing exists already?

    Well, summing up, the central migration advice again: Mind the sudo option in

    sudo -u list mailman import21 my-list@example.org config.pck
    
  • A Mail Server on Debian

    After decades of (essentially) using other people's smarthosts to send mail, I have recently needed to run a full-blown, deliver-to-the-world mail server (cf. Das Fürchten lernen; it's in German, though).

    While I had expected this to be a major nightmare, it turns out it's not so bad at all. Therefore I thought I'd write up a little how-to-like thing – perhaps it will help someone to set up their own mail server. Which would be a good thing. Don't leave mail to the bigshots, it's too important for that.

    Preparation

    You'll want to at least skim the exim4 page on the Debian wiki as well as /usr/share/doc/exim4/README.Debian.gz on your box. Don't worry if any of that talks about things you've never heard about at this point and come back here.

    The most important thing to work out in advance is to get your DNS to look attractive to the various spam estimators; I didn't have that (mostly because I moved “secondary” domains first), which caused a lot of headache (that article again is in German).

    How do you look attractive? Well, in your DNS make sure the PTR for your IP is to mail.<your-domain>, and make sure mail.<your-domain> exists and resolves to that IP or a CNAME pointing there. Note that this means that you can forget about running a mail server on a dynamic IP. But then dynamic IPs are a pain anyway.

    Before doing anything else, wait until the TTL of any previous records of this kind has expired. Don't take this lightly, and if you don't unterstand what I've been saying here, read up on DNS in the meantime. You won't have much joy with your mail server without a reasonable grasp of reverse DNS, DNS caching, and MX records.

    Use the opportunity to set the TTL of the MX record(s) for your domain(s) to a few minutes perhaps. Once you have configured your mail system, you can then quickly change where other hosts will deliver their mail for your domain(s) and raise the TTLs again.

    Exim4

    Debian has come with the mail transfer agent (MTA; the mail server proper if you will) exim4 installed by default for a long, long time, and I've been using it on many boxes to feed the smart hosts for as long as I've been using Debian. So, I'll not migrate to something else just because my mail server will talk to the world now. Still, you'll have to dpkg-reconfigure exim4-config. Much of what's being asked by that is well explained in the help texts. Just a few hints:

    • “General type of mail configuration” would obviously be “internet site“.
    • Mail name ought to be <your domain>; if you have multiple domains, choose the one you'd like to see if someone mails without choosing any.
    • Keep the IP addresses to listen on empty – you want other hosts to deliver mail on port 25. Technically, it would be enough to listen only on the address your MX record points to, but that's a complication that's rarely useful.
    • Relaying mail for non-local domains is what you want if you want to be a smart host yourself. You'll pretty certainly want to keep this empty as it's easy to mess it up, and it's easy to configure authenticated SMTP even on clients (also see client connections on avoiding authenticated SMTP on top).
    • Exim also is a mail delivery agent (MDA), i.e., something that will put mail for domains it handles into people's mail boxes. I'll assume below that you select Maildir format in home directory as the delivery method. Maildir is so much cooler than the ancient mboxes, and whoever wants something else can still use .forward or procmail.
    • And do split your configuration into small files. Sure, you'll have to remember to run update-exim4.conf after your edits, but that litte effort will be totally worth it after your next dist-upgrade, when you won't have to merge the (large) exim4 config file manually and figure out what changes you did where.

    DNS Edits

    With this, you should be in business for receiving mail. Hence, make your MX record point to your new mail server. In an NSD zone file (and NSD is my choice for running my DNS server), this could look like:

    <your domain>.  IN MX 10 <your domain>.
    

    (as usual in such files: Don't forget the trailing dots).

    A couple of years ago, it was all the craze to play games with having multiple MX records to fend off spam. It's definitely not worth it any more.

    While I personally think SPF is a really bad idea, some spam filters will regard your mail more kindly if they find an SPF record. So, unless you have stronger reasons to not have one than just “SPF is a bad concept and breaks sane mailing list practices, .forward files and simple mail bouncing”, add a record like this:

    <your domain>.                3600    IN      TXT     "v=spf1" "+mx" "+a" "+ip4:127.0.0.1" "-all"
    

    – where you have to replace the 127.0.0.1 with your IP and perhaps add a similar ip6 clause. What this means: Mail coming from senders in <your domain> ought to originate at the IP(s) given, and when it comes from somewhere else it's fishy. Which is why this breaks good mailing list practices. But forunately most spam filters know that and don't interpret these SPF clauses to narrow-mindedly.

    SSL

    I'm not a huge fan of SSL as a base for cryptography – X.509 alone is scary and a poor defense against state actors –, but since it's 2021, having non-SSL services doesn't look good. Since it's important to look good so people accept your mail, add SSL to your exim installation.

    Unless you can get longer-living, generally-trusted SSL certificates from somewhere else, use letsencrypt certificates. Since (possibly among others) the folks from t-online.de want to see some declaration who is behind a mail server on such a web site, set up a web server for mail.<your-domain> and obtain letsencrypt SSL certificates for them in whatever way you do that.

    Then, in the post-update script of your letsencrypt updater, run something like:

    /bin/cp mail.crt mail.key /etc/exim4/ssl/
    /usr/sbin/service exim4 restart
    

    (which of course assumes that script runs as root or at least with sufficient privileges). /etc/exim4/ssl you'll have to create yourself, and to keep your key material at least a bit secret, do a:

    chown root:Debian-exim /etc/exim4/ssl
    chmod 750 /etc/exim4/ssl
    

    – that way, exim can read it even if it's already dropped its privileges, but ordinary users on your box cannot.

    Then tell exim about your keys. For that, use some file in /etc/exim4/conf.d/main; such files are the main way of configuring the exim4 package in non-trivial ways. I have 00_localmacros, which contains:

    MAIN_TLS_ENABLE = yes
    MAIN_TLS_CERTIFICATE = /etc/exim4/ssl/mail.crt
    MAIN_TLS_PRIVATEKEY = /etc/exim4/ssl/mail.key
    

    – that ought to work for you, too.

    Then, do the usual update-exim4.conf && service exim4 restart, and you should be able to speak SSL with your exim. The easiest way to test this is to install the swaks package (which will come in useful when you want to run authenticated SMTP or similar, too) and then run:

    swaks -a -tls -q HELO -s mail.<your domain> -au test -ap '<>'
    

    This will spit out the dialogue with your mail server and at some point say 220 TLS go ahead or so if things work, some more or less helpful error message if not.

    Aliases

    Exim comes with the most important aliases (e.g., postmaster) pre-configured in /etc/aliases. If you want to accept mail for people not in your /etc/passwd, add them there.

    The way this is set up, exim ignores domains; if you told exim to accept mails for domain1.de and domain2.fi, then mail to both user@domain1.de and user@domain2.fi will end up in /home/user/Maildir (or be rejected if user doesn't exist and there's no alias either). If you want to have domain-specific handling, add a file /etc/exim4/forwards that contains pairs like:

    drjekyll@example.org: mrhyde@otherexample.org
    

    The standard Debian configuration of Exim will not evaluate this file; to make it do that, drop a file wil something like:

    # Route using a global incoming -> outgoing alias file
    
    global_aliases:
      debug_print = "R: global_aliases for $local_part@$domain"
      driver = redirect
      domains = +local_domains
      allow_fail
      allow_defer
      data = ${lookup{$local_part@$domain}lsearch{/etc/exim4/forwards}}
    

    into (say) /etc/exim4/conf.d/router/450_other-aliases. After the usual update-exim4.conf, you should be good to go.

    Client Connections

    This setup only accepts mail for transport locally, and it will only deliver locally. That is: This isn't a smarthost setup yet.

    For delivery from remote systems, we're using ssh because pubkey auth is cool. This even works from an exim on the remote system …

« Seite 2 / 3 »

Letzte Ergänzungen